W6 Lab

For application, I previewed two-way serial communication, and took one of my animation sketches from ICM class and have it controlled by Arduino.

In my original p5 sketch, I have two sliders one controlling the scaling speed and the other controlling the rotating speed of the squares, and also a button changing the color of the squares randomly. Each controlled by mouse dragging or clicking. So I thought it might be a good sketch to apply to serial communication as I can replace mouse interaction with potentiometers and button on my Arduino.

Read More

Week 4 Synth composition

My inspiration for this assignment is the Roland TB-303 bass line synthesizer, which creates a very distinctive squelching sound and is present in a lot of music I listen to. My goal was to regenerate a sound as close as possible to TB 303 with synth on Tone.js, by creating a repeating melody pattern and manipulate two of the variable parameters on the original synthesizer (filter envelope decay, and cutoff frequency or Q(resonance) ) and to have those parameters also manipulate my sketch on canvas. I looked up some characteristics of the synthesizer and found it is an analog subtractive synth that creates Sawtooth and square wave only, with no LFO, and a 24dB low pass resonant filter, non self oscillating. Both the amplitude envelope and the filter envelope have a sharp attack and exponential decay. With that goal in mind I played with a virtual TB303 synthesizer in the browser: and came up with a melody patch: https://soundcloud.com/chuchu-jiang/virtual-tb-303

Challenge:

  1. My original approach was to create a subtractive synth with Tone.oscillator and apply a filter, an amplitude envelope, and a filter envelope manually. However,  I couldn't figure out how to have an oscillator play a set of notes (an array of notes I assigned) generated with the same filter and envelopes(so I can later manipulate the whole melody with these parameters), because notes are passed in at the beginning: osc = new Tone.Oscillator("F2", "sawtooth");  and triggered separately with ampEnv.triggerAttackRelease(); and filterEnv.triggerAttackRelease(); ,where I cannot pass in a set of note values. I found a way around this problem by creating a MonoSynth instead, which has all the subtractive synth features built in(oscillator, amplitude envelope, filter and filter envelope), so that I can later pass my patch of notes in synth.triggerAttackRelease(note, duration); .
  2. I am still using Tone.Transport.position.split(":") to get position of beats and notes and Tone.Transport.scheduleRepeat() to play notes repeatedly, I used a nested for loop for 4 bars of 4 16th notes, which was a little bit redundant. I was exploring other ways of scheduling how to play a loop of different notes using Tone.part
  3. As I was trying to manipulate the synth features as well as my sketch while the patch is being looped, I realized I need to place those variables in the draw loop. Since I had the all the features of MonoSynth constructed in setup, I had to find a way to manipulate them in draw repeatedly. My first attempt(code) was creating new Tone.Filter, new Tone.AmplitudeEnvelope, and new Tone.ScaledEnvelope in draw and have  synth.connect(ampEnv);. but the sound would stop after a few loops, with some delay and noise and mouse location doesn't seem to change in Q or f values doesn't seem to affect the sound.  So my second attempt(code) was moving the whole MonoSynth constructor into draw loop, and the interaction seemed to work but still sometimes the audio loop would stop for a while before continuing to play. I was wondering if the delay in sound has something to do with the values I put in.   ===> solved: putting all the MonoSynth parameters in setup overloaded my browser causing glitch in sound, so I accessed the parameters by using dot notation: synth.filter.Q.value = q; and synth.filterEnvelope.decay = d;

At the end I combined my MonoSynth with my 2D toroidal flow sketch  and here is my final sketch .

https://youtu.be/K4LC2gTjgbQ

W4 Wave Sketch

I took my code from the Code of Music class' assignment and reworked it to add some interaction elements. I expanded my code from this sine wave example by creating a wave class using a constructor function and created 2 arrays of 8 waves objects, one array moving to the left and one moving to the right, and passed in wave speed, wave period, wave y location and wave color associated with the index of the array. I kept my setup and draw loop as clean as possible by using array of objects and kept most of the code inside the constructor function. I added mouse interaction so that when user click on the left or right half of the canvas, it slows down or speeds up the wave movement. At the same time when mouse click is at the top or bottom half of the canvas, it increases or decreases the wave amplitudes.

As I was creating the wave objects, I came across two different ways of creating objects in p5js, one is using a class, the other is using constructor function. It seems like either way works, but I was a little confused about the differences between the two methods.

To play here: https://editor.p5js.org/full/rJIWWa1qQ

code:https://editor.p5js.org/ada10086/sketches/rJIWWa1qQ


W3 Interactive Melody

I had an idea of mapping 8 different synth tones to keyboard keys asdfghjk, and extract the waveform properties from each synth tone using FFT, and display each tone vertically as a line across my canvas like this example: https://p5js.org/reference/#/p5.FFT. So each time a key is pressed, the relative note and line is triggered. I used the syntax from the example. However I couldn't get it to work, nothing was drawn on the canvas when I applied the example code. Later I realized, I was creating sound with tone.js, which is a web audio framework separate from P5.sound, therefore the tone.js and FFT functions in P5 sound would not be compatible. So I looked up FFT on tone API . However, I couldn't find any documentation on how to get an array of values from the function like the P5 example. The example codes in tone are very limited. So I changed my approach, instead of extracting properties from tone.synth(). I decided to sketch the waveforms manually and have each synth note trigger the wave. With that approach, I made two sketches. One for audio and one for visual.

With the visual sketch I have the certain parameters of the waveforms increment or decrement as I go down the lines. I referred to this sine wave example to and created a Wave object and generated an array of 8 waves, passing in wave speed, wave period and wave y location.  My biggest challenge for this part was to create an array of objects as the relevant topics have not yet been covered in ICM class.

With the audio sketch, I first used function keyPressed(){}:

function keyPressed(){ if (key === 'a') { synth.triggerAttackRelease("C4",0.1);

I played around with synth.triggerAttackRelease() and function keyReleased(){}. however, its either the sound stops before I release the key or it goes on forever.

I realized I wanted to achieve the effect that when key is pressed, the synth is played continuously, and when key is released, synth stoped.  So I used if statement within the draw loop:

if (keyIsPressed & key === 'a') { synth.triggerAttackRelease("C4", 0.1); }

I was able to hold down a key to play a note, but it doesn't sound as nice as the synth generated in the keyPressed function, there was a little buzz noise. 

And the issue I had with both approaches was I couldn't get multiple notes to play at the same time, ie to play a chord. There was only one note at a time even though I held down multiple keys on my keyboard.  ==> solution: use polysynth , updated synth code

My code: https://editor.p5js.org/ada10086/sketches/rkS9kvhtQ

To play fullscreen: https://editor.p5js.org/full/rkS9kvhtQ

Video:

https://youtu.be/hOIvTyy9OEI


W4 Lab

To apply all the topics we covered in the past two weeks, I came up with a 4/4 servo metronome which applies the concepts of digital output, analog input and analog output(PWM), tone() and servo.

Read More

W3 Reading reflections

One of my favorite quotes from the chapter Design Meets Disability by Graham Pullin, is "it is technology as a means to an end, not an end in itself ". "Design depends largely on constraints." - Charles Eames's disability inspired design also catalyzed a wider design culture. Constraints arise from both user needs and desires and from technical feasibility and business viability. A good design indicates a healthy balance between problem solving by recognizing the constraints and exploring freedoms by challenging the constraints. There are a lot of tensions between design for fashion and design for disabilities. The positive image of disability is achieved without discretion(invisibility) in the field of eyewear while design of hearing aids indicates priority of invisibility, and its functionality is in conflict with its miniaturization. Other wearable devices for disability such as prosthetics could support more positive image of disability, through emulating the approach of eyewear.

Read More

W3 Observation

As I commute everyday by NYC subway, I have observed as well as personally experienced the frustrations from millions of subway riders swiping metro card at the turnstiles. According to MTA's answer to how to use metro card on the subway, "With the MetroCard name facing toward you, quickly swipe your MetroCard through the turnstile in one smooth move. Walk through when the turnstile screen says "GO." It sounds fairly intuitive and simple, get the direction correct, swipe and go, which aligns with my assumption of how to use the metro card in order to get into the station.

Read More

W3 Sketch

I first created a static sketch with a loop of hollow squares. Then I thought about making it more dynamic by rotating and scaling it. I created two sliders , one controlling the rotating speed and the other controlling the scaling speed. and one button to generate a random color for the squares. My original intention for creating the slider was to use if (mouseIsPressed){} because it is used to test if mouse is being held down. So when I'm holding down the mouse dragging the slider, the code inside if (mouseIsPressed){} should be executed. However, I don't know why it did not work. So I referred to the example code for slider and it worked like a charm.

Code: https://editor.p5js.org/ada10086/sketches/HJHOLHEFX

W2 Rhythmic composition

My rhythmic composition is a techno beat loop, including three instruments: a hihat, a synth bass, and a kick drum. My time signature is 4/4. Each kick marks one beat, whereas synth changes its pattern every 2 beats, and hihat every 4 beats.  I subdivided each beat (quarter note) into 4 16th notes, as synth and hihat are arranged as quarters in every beat. I used Tone.Transport.position.split(":")[] to get the current position of beat and 16th note, however, the position of 16th note is not returned in integer[0,1,2,3] . Therefore, I had to convert it into integer using | , to get the exact 16th note position. I have one function for each instrument to call play as they are repeated in different duration(4n,16n). So for the first beat [0], for example, when beat == 0, 16th == 1 and 3 for synth, and 16th == 2 for hihat, and so on and so forth, I arranged the rest of the beats according to this diagram. img_7665.jpg

code: https://editor.p5js.org/ada10086/sketches/By5fJM4KQ


W2 Design rhythm interface - The hmtz hmtz train

As I was commuting on a train thinking about the elements of rhythm, I noticed that each time a chain of cars passes by a gap or a bump in between two sections of the train track, it would create a rhythmic bumping noise like the one in this video: https://youtu.be/MPPNqhf8fRs?t=29s

So I thought the noise is a result of a chain of cars passing a fixed point. And the speed of that rhythmic sound is a result of the moving speed of the train, as the train slows down, the pulse also slows down. So I played with the concepts of rhythms and the idea of passing train and its parameters like speed, number of cars, number of levels, numbers of doors and windows, and I was imagining a rhythm interface that is a train passing a gate that triggers different levels of sounds stored in each car. So I created this sketch:

IMG_7664

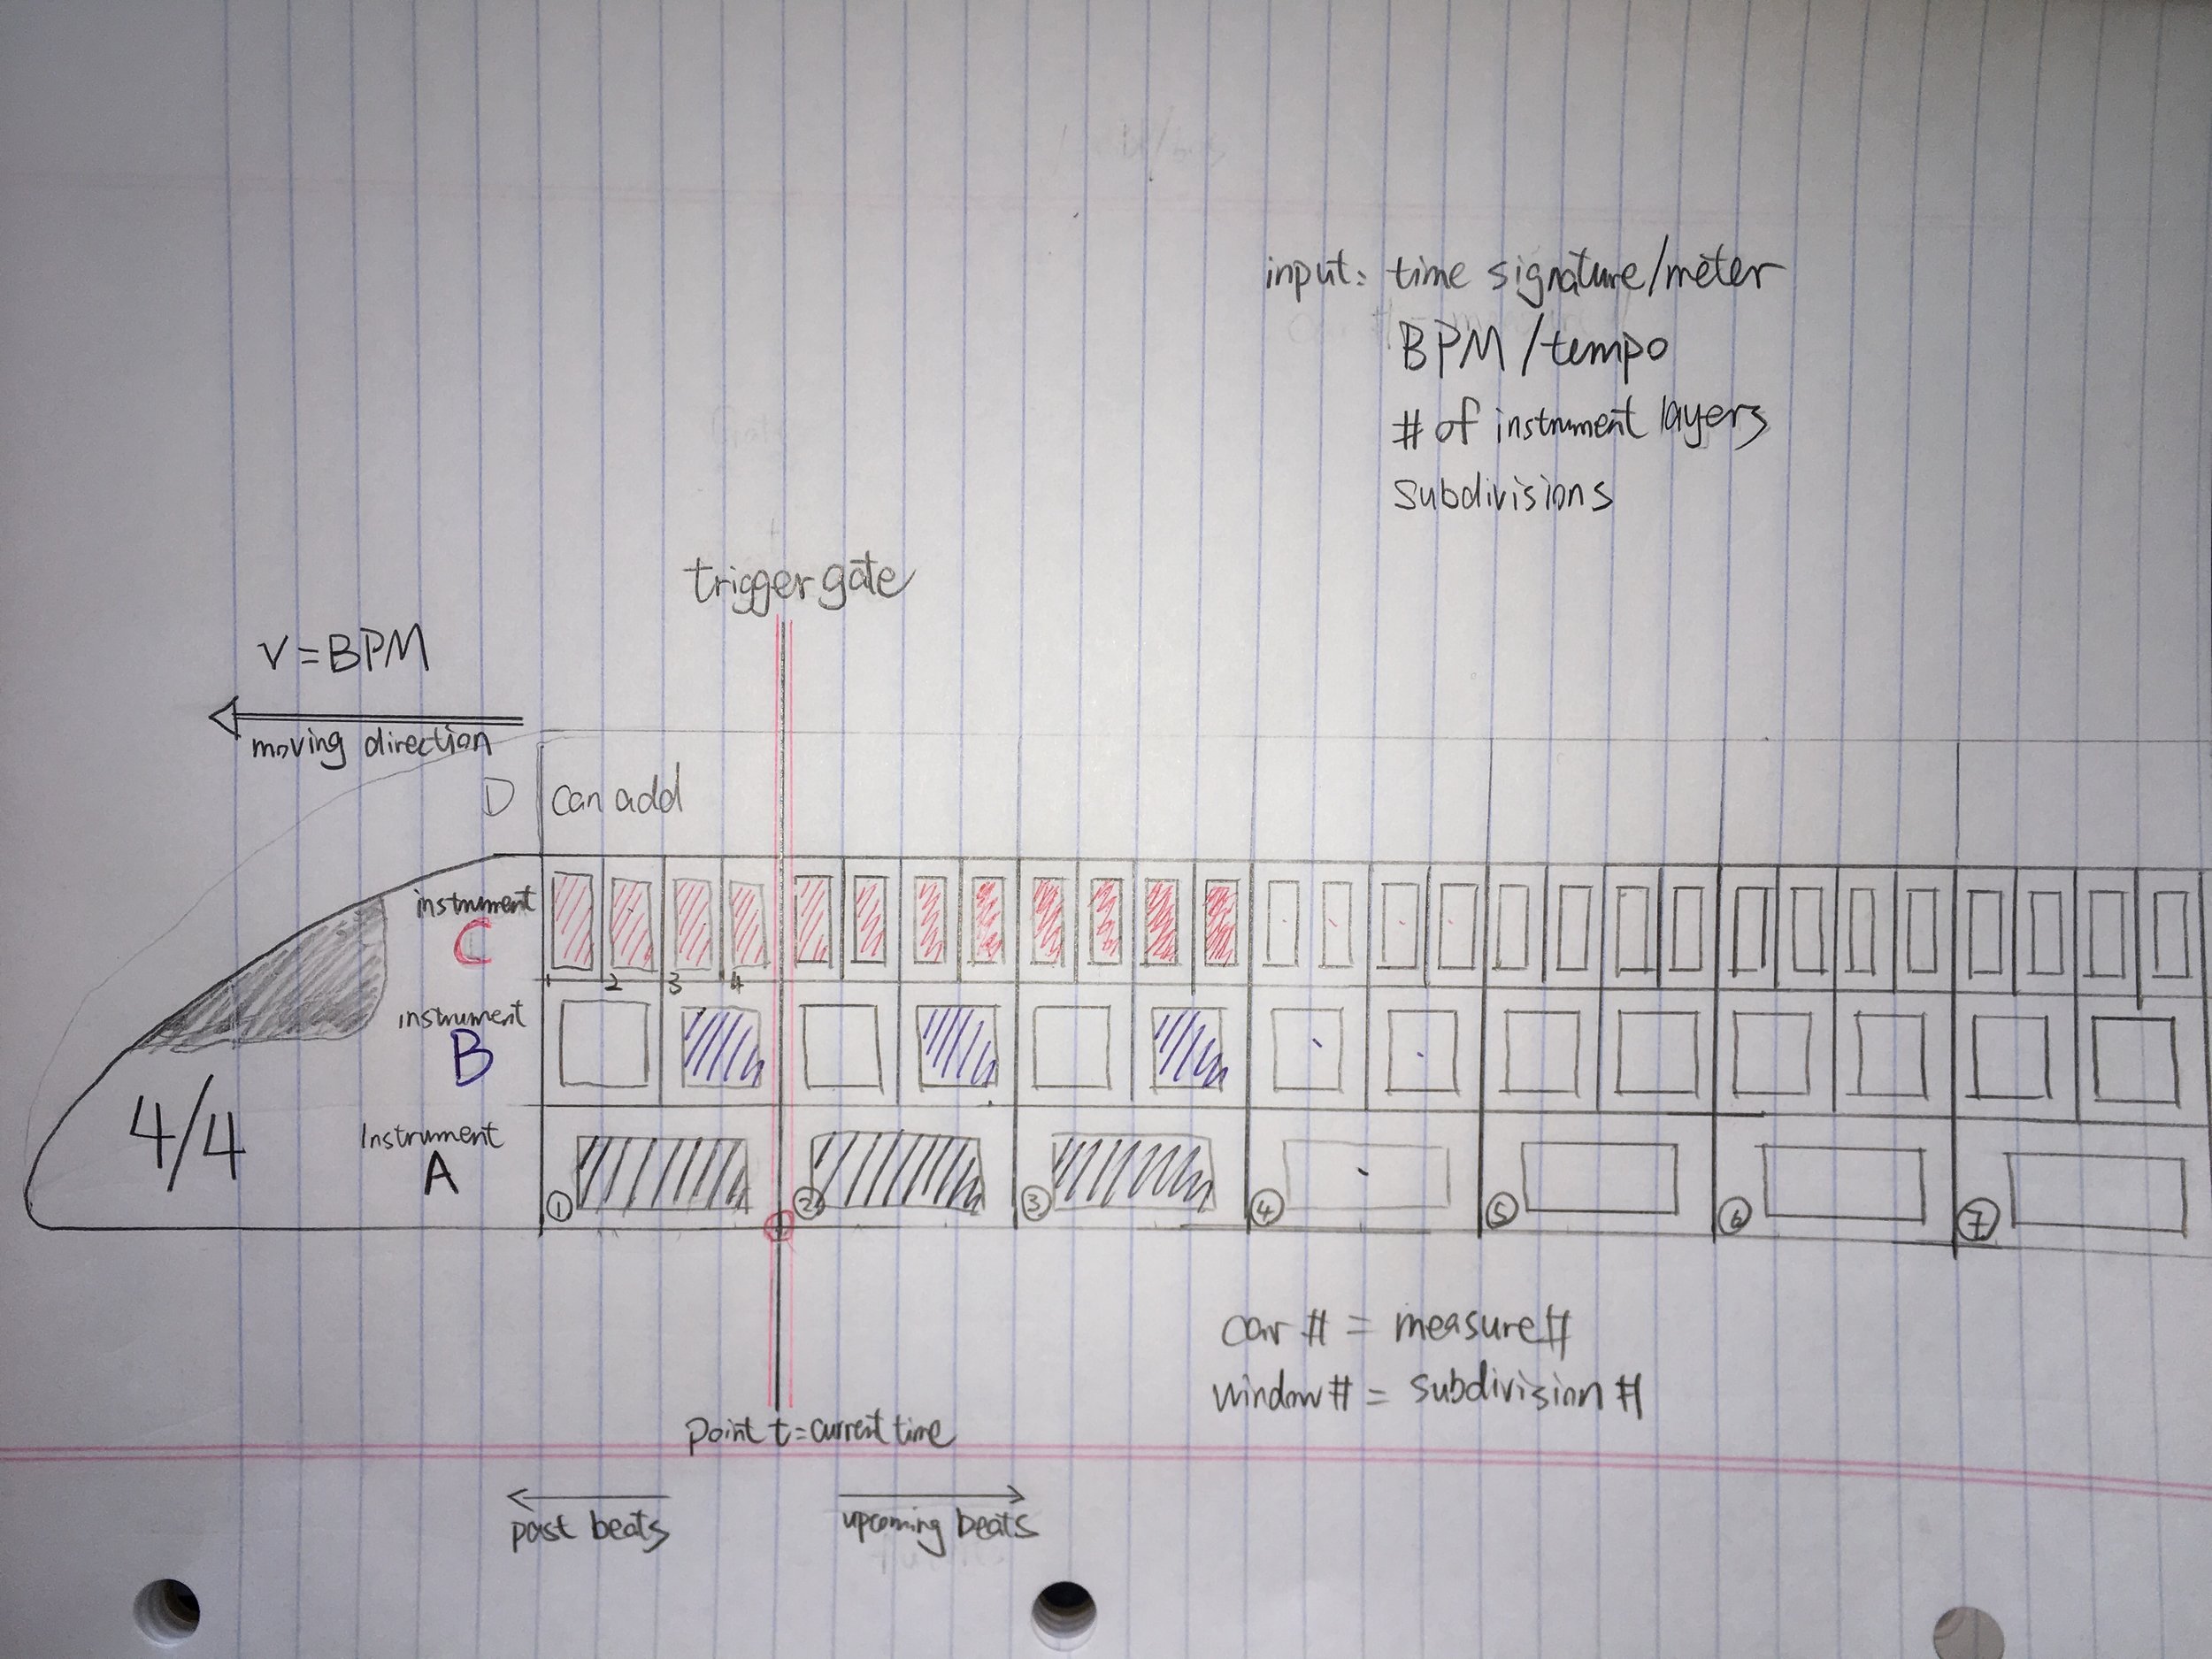
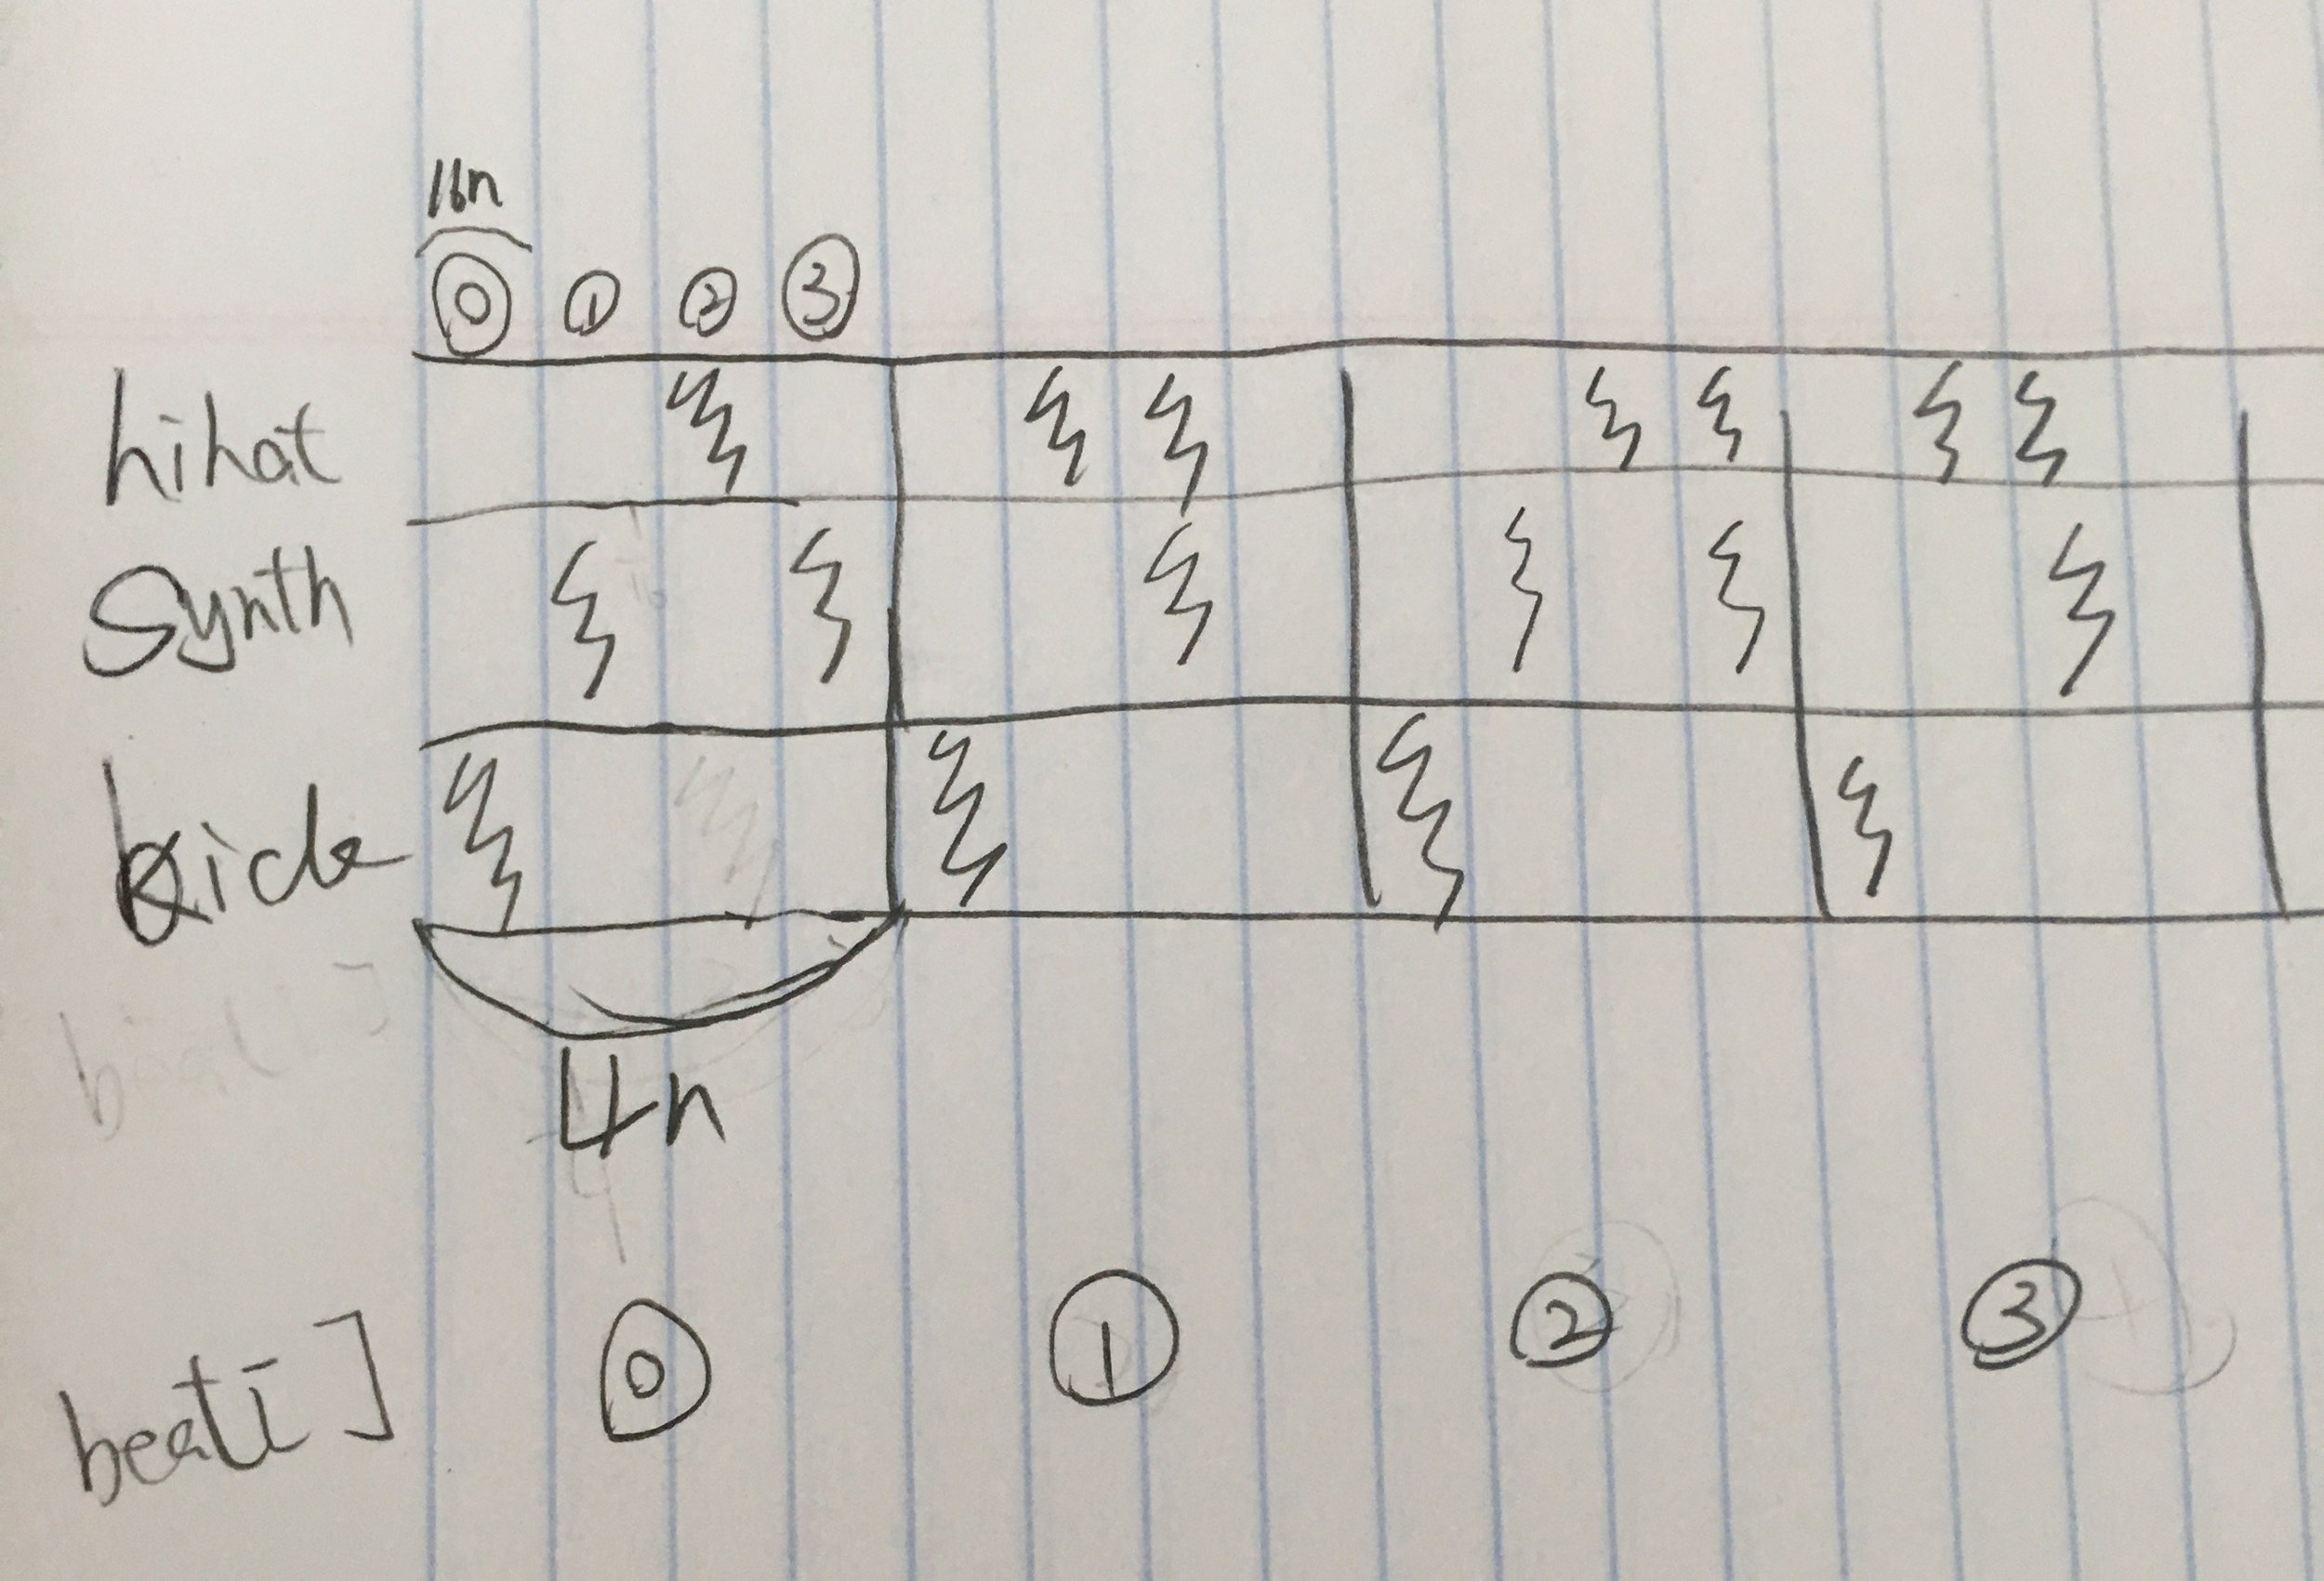
The train interface is constructed with several parameters:

# of levels: players can import multiple beat samples, each sample track creates a level on the train, tracks stack on top of each other vertically like different levels of the train. The number of levels indicates the number of instrument tracks.

# of cars: the entire length of the train is consist of many cars connected horizontally. Each car number indicates the measure number.

# of windows: players can input a time signature at train head and divide each level of a car into smaller sections represented by the number of windows on each level, this is to mark the subdivisions(windows) in a measure(car). If a player decides the meter to be 4/4, 1 full window on a car is 1 whole note, 2 windows are 2 half notes, and 4 windows are 4 quarter notes, etc... players can then toggle on and off the lights on each window to place a beat of a certain duration at a certain subdivision in a measure, and copy a certain pattern to paste in later windows. As an example, in this loop, the most basic house/techno music rhythm pattern, the black windows in the sketch represents kick drum, blue window snare drum and red window hi-hat.

Speed of the train: players can also input speed of train in the form of BPM, the higher the BPM, the faster the train moves. for example if the meter is 4/4, BPM is 120, there is 120/60=2 beats per second. So we can imagine in every second, two windows of quarter notes would pass a certain point.

Gate: somewhere in the middle of the screen, there is also a gate, a fixed point for each car of the train to pass, acting like a trigger point for each notes(windows) carried in the car. The train travels from right to left, the gate represents current time; everything to the left of the gate is past beats; whereas everything to the right are upcoming beats to be played when they reach the gate.

----------------

Limitations I can think of right now: since I have not yet seen this moving train in action, I can not picture how fast it will move if I set the BPM to a common value like 160, if it moves too fast it will be really hard for our eyes to catch each beat and understand what is really going on in each measure.

Applications: I can see this interface being a game/instrument to be experimented by kids who are learning music and want to create their own beats by helping them visualize how rhythm works while having fun running their own train.

W2 Response to interactive rhythm projects

Two of the drum machine examples that impressed me the most are Groove Pizza and TR-808 re-creation one. Groove Pizza has a very simple, and visually appealing interface. It managed to spatially map every single beat generated by different percussion instruments into points in 2D circular plane, aka, pizza. One cycle through the pizza represents one measure/bar. The number of pizza slices represents the number of subdivisions in a measure. The points are then connected to form different shapes, most of the time symmetrical, given the repetitive nature of rhythm. Therefore, notes on a linear timeline are formed onto a more recognizable spatial arrangement in front of players. Different genres of music have different shape patterns on the pizza, which tells player a lot about the rhythmic characteristics of that genre. I can see this application has great educational potential in music education.

However the project I had the most fun playing with is the Roland TR-808 recreation. It took me a while to figure out how to use it and what each knob and button are for. I looked up the original physical model and noticed they look pretty much the same. This project lacks originality and creativity as it's simply a virtual duplication of the physical machine. However by playing with the web version I was able to get the gist of how the physical drum machine works without having to visit a store or obtaining a physical product. I can see this project being applied to many other musical interfaces by demonstrating how to use them in a very accessible web environment, so that both amateur and professional producers are able to "try out" the machine virtually before they decide which instruments suit them the best.

Here's a screen recording of my first TR-808 creation:

https://youtu.be/1TAtorV5uqw


W3 Lab

Application: analog input from temperature sensor to indicate whether water is cool enough to drink.   As shown in the videos below, when the temperature sensor is attached to a cup of water at 30 degree Celsius, green LED is lit, indicating ok to drink; when sensor gets close to a cup of hot water >57 degree celsius (I picked the value from a study which claims the optimal drinking temperature of hot drink is 57), red LED is lit, indicating it's too hot to drink. Of course the temperature threshold here is arbitrary, I can adjust the value to whatever I want.

Read More

W2 Reading reflections

Chapter 1 The Psychopathology of Everyday Things of Design of Everyday Things has provided me some very great insights on principles of physical design. Author Norman has illustrated his ideas with many real life good and bad examples like telephones, cars, and watches which I can closely relate in my everyday life. I understand that how we work/use/operate things should be reflected by the design of the things themselves without any needs for words or symbols.One of the most important principles of design is visibility. Natural design gives natural visual cues to convey how to correctly work with things. A successful design should have visible instruction or cues with feedback of actions, and there should be enough feedback for different features. There should also be a close relationship between what you want to do and what seems possible when mapping things. Natural mapping between a control and its function comes from physical analogies and cultural standards, rather than arbitrary decisions. There should also be constraints to limit the possibilities to avoid confusion. The psychology of materials/affordance of things(purpose) also matters: different materials is used for different things, which also direct people to interact with things differently.

Read More

W1 Create a digital, audio-visual, sample based instrument

  As I'm still a beginner user of the p5js web editor, for this audio-visual sample based instrument assignment, I was only able to create some simple visuals. The best sound sample to go with my visual is minimal ambient and analog sounds. I used two samples from freesound.org I named ambient and signal. I also referred to p5 sound library to generate an oscillator with new p5.noise() as the third sound.

I started with creating a snow screen with all random greyscale pixels similar to the old fashioned static TV screen. Then I had key 'a' to toggle play ambient.wav and the snow screen.

Then I used mousePressed() to turn on signal.wav, which is a higher pitch white noise. At the mean time the snow screen turns into RGB scale from greyscale. When mouse is released, however, the RGB is turned off.

Finally I created a greyscale slider reactive to mouseX, to change the bandpass frequency of the filter of the p5.noise oscillator generated. I referred to: https://p5js.org/reference/#/p5.Filter . The bigger the mouseX value is the higher the frequency.

The longest time I spent when I was stuck was to figure out how to toggle play with key and mouse, using boolean aPressed, sound.IsPlaying(),  and figure out how to use event functions like keyPressed(), mousePressed(), mouseReleased() .

I wanted to keep this first project relatively simple as I slowly start to build my programming skill. Therefore I did not spend much time worrying about the sound input.

my code: https://editor.p5js.org/ada10086/sketches/SJz68kd_Q

A screen recording of me playing with the instrument:

https://youtu.be/G0yhnVROViA


W2 Sketch

My week 2 assignment I have my background generate a random greyscale color every time i run the sketch. Then drew a square in the middle of the canvas with its size and rotation controlled by mouse position.  The size is determined by the distance between mouse position and the center of the canvas, s=dist(width/2,height/2,mouseX,mouseY); The rotation angle is controlled by mouse position relative to the center of the canvas. I drew this diagram to better illustrate how I derive the angle of rotation from mouseX and mouseY, by using arctangent formula, in p5js reference, I found atan().

IMG_7578

Then I drew four smaller rectangles on four corner of the canvas and have them rotate and change color over time independent of the mouse.

I found it mesmerizing to play with the image. Depending on the speed I move my mouse and the direction I rotate my mouse, each time I create completely different effect like the ones below.

link to my sketch:https://editor.p5js.org/ada10086/sketches/S1y0dvB_X


W1 Reading Reflections

Hands really are amazing "tools" we all inherently own since the beginning of the humanity. It is amazing how a great variety of intricate tasks we can accomplish with our bare hands as we grasp, touch, pick, thump and performing all kinds of movements. Bret Victor's “A Brief Rant on the Future of Interaction Design” is looking at today's technology innovation from a different perspective. Rather than emphasizing on the human demand(need) or functionality improvement(technology) or fancy interfaces, he inspired creators/designers to think more about untapped human capabilities like what other things our body parts, not limited to hands, can do instead of simply touching and dragging on the "Pictures on the Glass". He calls attention to our bodies' tactile abilities to feel and sense things, which can be easily ignored when we orient our technologies around glassy visual displays. He plead to not bypass some human capabilities we take for granted. As the starting point and the center for any design is human. I was interested in how he discusses the brain interface in response to others' comments. Technology should not sacrifice/decrease our bodies' capabilities, rather it should be adapted to fit our bodies and to expand our capabilities. The future of interaction design is calling for more extensive human research than ever.  

Read More

W1 How computation applies

My passion for music and career background in the music industry have led me to all sorts of live music experiences from concerts, parties, and festivals. Throughout the years, I have been fascinated with how musical artists really pushed the boundaries of their live performances and enhanced musical expression with crazy visual effects, be it 3D hologram, giant audio-reactive light installations, or large-scale projection mapping. Music videos and other promotional materials also kept evolving with digital technology. This multi-sensory perception of the low-dimensional sound waves has been evoking our emotional responses in a way we never would have imagined. I am particularly inspired by one of my favorite producers, Max Cooper. In his project Emergence, he and fellow visual artists and scientists generated biological simulations of natural patterns following the direction of his music. And I especially admire computer artists Casey Reas and REZA, whose works exhibit the surreal beauty of pure geometrical forms generated from codes and mathematical equations. As digital technology has been revolutionizing the way music is created, I believe there is no better way to represent computer-generated sound with generative art. Therefore, this semester, I’d like to make some projects that apply computation to generate graphics to visually interpret sound or music.

W1 Sketches

Having some degree of knowledge in programming with Processing, I was able to quickly pick up what I used to know in Processing and apply it in the p5.js web editor. There are a lot of similarities given that both are intended for drawing. In first week’s of progress, I have also learned many differences through both the lecture and assignments. Processing uses the programming language Java and runs locally on the computer, whereas p5.js is in Javascript and runs on the webpage, making it easier to share. Instead of “void setup” and “void draw” in Processing, p5.js uses “function setup” and “function draw”; Processing uses “size” to define size of canvas, while p5 uses “createCanvas”; “pushMatrix” and “popMatrix” are now simply “push” and “pop”. Origin (0,0,0) for WEBGL mode in p5 is in the center of the canvas. “println” is now “print” or “console.log”. My first sketch is a static abstract structure I named “gate”, I randomly jot down some coordinates with beginShape() vertex() endShape() and ended up with an irregular quadrilateral. I then made duplications of the quadrilateral by rotating it in 3D space. So I looked up in the reference, in order to sketch in 3D, I need to set up my canvas as WEBGL in createCanvas(400,400 WEBGL) in function setup. Then I rotated the quadrilaterals around Y axis, and each time I added the rotation, I scaled down the sizes proportionally, so they overlapped and created a sense of depth. One problem I encountered was when I changed to WEBGL mode, my shapes shifted a little, and I found out the origin is no longer on the top left corner, instead it is in the center of the canvas. So in order to shift things back in the middle, I used push(), pop() and translate(). Then I added a line as a ray crossing the quad gate and an arc on the left to balance the abstract image. Having some prior knowledge with statements like for/while, if/else, I was aware that I could use fewer lines of code to produce this graphic with for loop by incrementing/decrementing the rotation degree and the scale of each loop. However, since the week 1 assignment focuses on using simple 2D primitive shapes, I thought I’d recreate this when we talk about for loop.

Screen Shot 2018-09-06 at 6.45.39 PM

Gate

In my second dynamic sketch, I wanted to create something that’s not just triangles, circles or squares, which I used to play around a lot in Processing, so I thought about polygons. And I found the polygon documentation in the p5.js reference. Unlike a single line function like ellipse() or rect(), a polygon() function does not already exist in the p5.js library. So before calling polygon() with some parameters, I had to first declare my own polygon function with input parameters (center x coordinate, center y coordinate, radius, number of points).  After understanding the math behind the polygon parameters, I generated a heptagon and a triangle with the polygon function and used push(), pop(), translate() to move them to the center of the canvas. Then I decided to animate them with rotate() by passing frameCount into the function. As frameCount is always going up, it ensures the shapes are constantly rotating. Then I was just playing around with the parameters of the shapes and multiplied the radius of the polygons with sin and cos values so that the radius increases and decreases rhythmically. I also moved background() into setup so that each time the draw loop updates, the last sketch stays, leaving behind a trace of previous shapes, creating a hypnotic effect.

Screen Shot 2018-09-06 at 6.45.49 PM.png

Rotating Polygons

My takeaway from this assignment is that without a specific goal in mind of what I wanted to create in the first place, it is always fun and rewarding to start with something very simple and gradually adding things on top of it and play around with parameters and move things around. The results can be very interesting and unexpected.

W0 Music Sharing — Stephan Bodzin – Lila

Picking one piece of music to share is the hardest thing for me ever. I stumble upon millions of amazing creations and get inspired every second of it as I listen to at least 5 hours of music on an average day. A handful of great pieces came to my mind while brainstorming which one I'd like to share with The Code of Music class. I found "Lila" by German producer Stephan Bodzin from his album "Power of Ten" might be a great example of new media art in the form of digital audio production and computer generated graphics. The visual representation resembles simple crayon-drawn vertical lines increasing in its quantity, while gradually intruding towards the viewers from its 2D plane into 3D space. The simplicity in this animated graphic represents the great depth and power in the rhythmic layers and beautiful chord progression in the music. I remember when I first came across this song I was in awe as it evoked so much emotional response and threw me into deep contemplation. I found it hard to pick a 30 second part because the song is more about the structural add-on and subtle development throughout the 7 min duration than it is about the traditional verse-chorus-verse musical structure. However if you do not have enough attention span to enjoy the whole song, I suggest slowly scrolling through different parts of songs from beginning till the end and notice the change in graphic and musical progression.

https://youtu.be/jF_hBX-6x9s