

My final is a collaborative project with Vince and Yves, combining Physical Computing, ICM, and Code of Music. It is an interactive voice/sound installation about a future AI therapy program – Jane.
Read MoreW9 Music Exhibition Design
Me, Adi and Camilla teamed up this week to build a virtual interactive museum exhibition explaining techno music. First, we analyzed some musical concepts defining the genre techno:
The central rhythmic component is most often in common time (4/4), where a single measure is divided into four beats marked by a bass drum on each quarter note pulse. Each beat can be further divided, with eighth notes dividing each quarter note in half and sixteenth notes dividing each quarter note into quarters. Famously called “four-on-the-floor,” the bass drum is the automated heartbeat or metronome around which all other sounds fall into place: a backbeat played by snare or clap on the second and fourth beats of the measure, and an open hi-hat sounding every second eighth note. The tempo tends to vary between approximately 120 to 150 beats per minute (bpm), depending on the style of techno. Techno focuses more on sophisticated rhythm and repetition (cross-rhythm, syncopation) than it does on melody or chord progression. The development is gradual where many sounds are layered and altered over time. All of these characteristics together create something automatically definable as techno.
Techno is a landscape. It’s a reaction and artistic statement about the actual automated world that we live in. It’s half machine & half human! Techno’s highly repetitive and mechanic rhythmic structure against human expressivity in sampling, modulating, remixing and looping shapes its unique art form.
From here, we identified three elements of modern techno music: 1. Repetition - “four on the floor” as the basic unit 2. Instruments being layered/omitted one by one over the course of a song 3. altering/modulating a sound texture gradually over time
With the elements in mind, we think the best way to explain how Techno music works is by deconstructing an existing techno song into individual instrument layers as the building blocks. We will have users rebuild their version of the track by adding and subtracting layers and playing with different combinations on top of the 4/4 rhythmic structure and give them expressive controls over multiple parameters that control certain layers.
Inspired by Valentina’s presentation with the different musicians for the fantasy Blues band, we came up with the idea to present different options for each of the elements, to give the user in our museum some feeling of agency of being able to choose their own sounds and controllers within the constraints of a techno infrastructure.
Our interface is inspired by the popular DAW Ableton Live's session view, but without the intimidating panels and knobs, reduced to the bare minimal core of triggering and stopping clips. Each instrument (in our case: a bass drum, multiple hi-hats, clicky percussion, rim, bass, brass hooks, pad drone, and a sequence) is a column of clips represented by blocks which are clickable for enabling and disabling. Since session view is non-linear, we decided to have a visual indicator to show where in the timeline the sound is out of 4/4 -- all following the bass drum as the heart of the song. Users will be able to modulate some parameters of certain instruments over time by dragging the sliders underneath the instrument columns. Some visual guide for the interface: https://www.are.na/adi-dahiya/techno-is-a-landscape
I started off by searching for stem files of existing techno tracks available for downloads so that I could have separate files for individual instruments. And I found Solace by Pan-Pot a good example of a techno song that can be used. So I opened up the files in Ableton and reduced each instrument track into its smallest unit and exported all the clips to be mapped into buttons on P5(sketch). I uploaded all the clips onto P5 and had all the percussive instruments looped every measure with Tone.Event. However I was having some trouble with instrument clips when looping them with Tone.Event, as since instrument clips are much longer 10-30m per loop. the clips don't start or stop until the current loop has ended, i.e. if a button is pressed at a random time, instead of loop starting/stopping at the following measure, it would start/stop until the beginning of next loop, which takes a long time. So I decided not to use Tone.Event, and just have the button control the start() and stop() or the Tone.Player, however, the clips would be out of sync with the percussive clips. I did some research and found that I can sync Tone.Player to TransportTime with sync(). The clips would still start/stop at an arbitrary time at mouseClick but I fixed it by adding the transport time of the next measure to start(), so that no matter when the user turns on the clips, they will still be in place with one another. Although I found the process of splitting Tone.Transport.position to get the measure and switching back and forth between a number and a string was a little tedious, I haven't figured out a better way to achieve enabling/disabling a long looping clip at the start of next measure.
Another big challenge for this project was to figure out the best modulating parameters for the instrument track. When listening to the original clip, it was very noticeable that certain parameters of the sound (high pass filter frequency? Resonance?) have been changed over time, when I tried to recreate that modulating effect using Tone, it was hard to pinpoint which effects were being used or which parameters were being altered. It seemed a little overwhelming because there are tons of parameters that I could experiment with and tons of variables, value ranges I could test with.
Ultimately, for a museum environment, we imagine that our installation could be shown as it is now, on a screen, for the user to play with using headphones or speakers with instructions popping up from time to time to prompt users to enable or modulate clips, similar to this Jazz Computer project. This is to suggest users what could be a proper progression of a techno song, but it's up to them to follow the instruction or not. Alternatively, it could be installed in a more immersive environment, such as in a room with surround sound, featuring tactile buttons that would trigger each sound with visual feedback on the walls around the user, which would line up with the instruments they have selected and where they are in the timeline.
live audio-visual techno generator
Among all the music elements we have discussed in Code of Music class up till week 6, I found the topic of Synthesis most interesting and at the meantime challenging for me. Having studied music theory and played classical piano music for a long time, I found rhythm, melody, and harmony rather old and familiar concepts. Whereas, synthesis, the technique of generating music from scratch using electronic hardware and software, was never taught in my previous theory classes. Having a little bit of knowledge on synthesis from my Intro to MIDI class in the past, I still felt a little hard to wrap my head around the code that applies all these new concepts even after I finished my synth assignment. So I decided to challenge myself and refine this assignment by focusing and experimenting further with some synth techniques. In my previous synth assignment, I drew inspiration from the Roland TB-303 bass line synthesizer and created a simple audio-visual instrument that manipulates the filter Q and filter envelope decay. TB 303 has a very distinct chirping sound which became the signature of the genre acid house and a lot of techno music. Having listened to million songs in those genres, I have grasped on the surface certain patterns in the subtle and gradual changes layer by layer. After discussing with Luisa and resident Dominic, I thought why not expand my assignment into an audio-visual techno instrument with multiple control parameters for myself and other amateur fans to play with and experience the joy of creating/manipulating our own techno track on the go.
In the beginning, I was completely lost and didn't know where to go about starting this project. Nevertheless, I started experimenting with all types of synth and effects in Tone.js docs, and some ideas started to merge.
I used a MembraneSynth for kick drum and a Loop event to trigger the kick every "4n", to generate a four-to-the-floor rhythm pattern with a steady accented beat in 4/4 time where kick drum is hit on every beat (1,2,3,4). And also connected a compressor to the kick to control the volume. I asked how I could manipulate the bass without changing the synth, and I thought about a most common way when DJs mix tracks is to apply a high pass filter to swoop out the bass sound during transition. Therefore I added a high pass filter to my MembraneSynth controlled by a kick slider and also had the slider change the brightness of the entire visual by inverting the black and white color. I referred to this article to set my filter slider values. "Low end theory: EQing kicks and bass" : "put a similarly harsh high pass filter on the bass sound and set the frequency threshold at 180Hz again, so that this time you're scooping out tons of bass. "
In my original assignment, I only had one fixed set of notes generated by a MonoSynth being looped over and over, which contains 4 beats of 4 16th notes in each beat(4/4 time signature). After running the code over and over during and after the assignment, the melody was stuck in my head and I started to get annoyed the same notes. I knew that if I were to create an instrument not just for myself, the main melody line needs to have more variety for user to choose from, so it can be more customized. Again, inspired by the virtual TB 303, I really enjoyed the feature of randomizing the notes in the editor, and decided to recreate the randomize function in my instrument so that if users don't like the note patch, they can always keep randomizing to generate new patches until they find one that satisfy them. Therefore, I added a randomize function tied to a randomize button, and looped the MonoSynth notes every "1m"(16 16th notes) with a Tone.Part (funtion(time, notes)) event to pass in randomly generated notes each time user click the button. I initialized 16 16th notes in timeNotes array with each item in the array contains a time and note array ["0:0:0", "Bb2"], and created another synthNotesSet array with all 13 notes in the octave C2-C3 and some 0s as rest for computer to pick from. I accessed each 16th MonoSynth notes by using synthPart.events[i].value to overwrite previously generated notes as well as print out the generated notes in the randomize function, so users can see what notes are being played.I also added a compressor to MonoSynth to control the volume. Same as the previous assignment, I had mouseX tied to Q and the circle size, and mouseY to decay and circle density, but instead of moving mouse to control, I changed it to mouse drag because later I created some sliders for other parameters, changing slider value would interfere with Q and decay as the whole window is my sketch. However, I noticed that when my mouse is dragged over the slider, it would also change my Q and decay value, I want each parameters to be controlled independently from each other, so my solution was to confine the mouse drag for Q and decay within a square frame with the same center as the circle.
I had the square as a visual reference for manipulating the MonoSynth, but it was static and I wanted to animate it somehow to have it reactive to some sound parameter, so I thought about adding a hi-hat layer to my composition to make it sound richer. I tried to create a NoiseSynth for hi-hat but however I changed the ADSR values around, I could never achieve the effect I wanted. Sometimes I would hear the trigger and sometimes it was straight up noise, and it sounded very mechanic, not the hi-hat that I wanted. Instead of using a NoiseSynth, I decided to just use a hi-hat sample and trigger it every "4n" with Tone.event and a playHihat callback function. I started the event at "0:0:1" so the hi-hat is on the backbeat. As I was telling my classmate Max that I was not sure if there is a way to animate the square rhythmically with the hi-hat without manually calibrating the values, which was how I matched the bpm with pumping size of the circle in my original assignment, Max showed me his project 33 Null made with Tone.js, where he used Part.progress to access the progression of an event with a value between 0 - 1, which he then used to synch his animation with the sound user triggers. I was so excited to find out about the trick. I had my circle scaler and square scaler mapped to kickLoop.progress and hihatEvent.progress, so that the pumping circle and square are more precisely controlled by BPM/kick drum/hi-hat, therefore to create a more compelling visual effect. I also imagined changing the closed hi-hat into an open hi-hat with another slider. I tried different effects on the hi-hat sample and ended up using a JCReverb. I wanted to create the tracing circle effect Max did in his project on my square frame when Reverb is applied, but for some reason I couldn't apply it to my sketch. So I came across Shiffman's tutorial on drawing object trails for my square frame. I created a Frame class, and I had rectTrails mapped to the hihat slider value which also controls the reverb, and had rectTrails to constrain the number of trails generated (frame.history.length).
During my experimentation with synth, I liked the fmSynth sound a lot, and decided to add another layer of low pitch synth sound to fill the depth of the overall composition. I wanted to generate a random fmSynth note by keyPressed from the randomized MonoSynth note patch so it doesn't sound too dissonant, but I also wanted to exclude the rest "0" from synthPart._events[].value, so that every time key is pressed there is note being played instead of silence. I did some research on how to generate one random index from an array but exclude one. And I saw this example . So I created a function pickFmNote() that returns to itself to generate a new note until it is not "0". I wanted to use FFT/ waveform to visualize the fmSynth going across the canvas. I referred to the source code for this analyzer example, and I was having a lot of trouble connecting my fmSynth to Tone.Waveform. I referred to another envelope example that draws kick wave live from kickEnevelope. I viewed the took the block of code from the source code where the kick wave was drawn and replaced kickEnvelope with fmSynth.envelope.value. The result did not look the same as the example but I was quite surprised to see the effect of dispersing dots when fmSynth was triggered and converged back to a straight line when it was released, so I decided to just go with this accidental outcome.
There is only limited amount of things I could achieve in a week. The more I expand on my project, the more ideas start to emerge and the more I feel compelled to improve it and add more features. Right now I have a finished audio-visual instrument, where users can create their own composition. However, I would take this project to the next step by refining the sound quality, experiment with the envelope parameters and effects more to make each layer sound more compatible with each other, and overall less cheesy and mechanic, as well as adding more controls to turn each layer on and off to generate more variety of layer combinations.
my code: https://editor.p5js.org/ada10086/sketches/rJ2k48z3X
to play: https://editor.p5js.org/ada10086/full/rJ2k48z3X
instructions:
click the randomize button to generate a set of randomized monosynth melody
drag bpm slider to change the speed of composition
drag the hihat slider to add reverb to hihat
drag the kick slider to filter out kick drum
press key 'a' to play an fm synth generated randomly from the monosynth notes set.
Demo1:
https://youtu.be/zmlSP3IMHuk
Demo 2:
https://youtu.be/eZYGB9h9isY
W6 Interaction response
I had a lot of fun playing with the Keezy classic recorder+looper and the Sampulator keyboard sampler. I like the Sampulator interface in the way that it looks very neat and straightforward as it visually maps all the samples to each key on the keyboard, with first percussion samples on first two rows and melody on the third row and human voice samples on the last row. There is a lot of possibilities to the sound that users can create and it can sound very rich because there're so many keys to play with. It also comes with a metronome/time signature and a recorder.
Similar to Sampulator, the Keezy classic operates on smart phones, instead of pressing the keyboard to trigger sound samples, Keezy divides phone screens into 8 grids and tapping each grid triggers a sample. Sample size wise, there are a variety of sample packs but each one can only play 8 samples at a time, as opposed to the greater possibility of sounds generated from a full keyboard. However, an advantage of this is that users can easily locate which grid triggers which sample, and trigger samples they want with higher accuracy. Keezy also allows users to record their own samples and map them onto the grids so that they can create their own simplified MIDI controller to trigger 8 samples of their own, as well as make as many sample packs as they want, which is a cool feature that Sampulator doesn't have.
W6 Singing animal sampler
My inspiration of a singing animal sampler came from the youtube/vine sensation of animal voices singing to pop songs with accurate pitches. The most typical and popular example is Gabe the dog, who barks to tons of hit songs, commercials, and movie tracks. Similar to Gabe the dog, I decided to focus on sampling in music production and create an animal sampler, with a selection of different animal sounds and sample them to generate pitches in a major scale. I found some very distinguishable animals samples from freesound.org: dog, cat, cow, sheep, chicken, crow, trimmed the original clips to have them represent one note(F) in the center of the C major scale, so that the animal sounds don't get distorted as much when the pitch goes higher.
I added a dropdown menu with createSelect() in the DOM, to select between different animals sounds.
My biggest challenge, however, is to get the DOM element to interact with animal animation and sound, which I elaborated more on my ICM blog post.
https://youtu.be/m6F_yL2m_m8
To play: https://editor.p5js.org/ada10086/full/SJ8-14tj7
My code: https://editor.p5js.org/ada10086/sketches/SJ8-14tj7
W5 Harmony Interaction
My goal for this assignment is to create a drone piece, with a bass line with the same repeated note and a top melody line, the interaction was to move the mouse across the canvas, which is divided by 12 strips, to transpose the whole piece each time by half step every time a new strip is displayed. My inspiration for the Pipes sketch from ICM. Because my sketch looks like a pipe organ, I used synth.set(), to apply a triangle oscillator to make it sound more like an electric organ.
Challenge 1
I couldn't figure out how to use Tone.Event or Tone.loop to loop my set of notes, which I was also not sure if it was achievable. My guess is both events loop the callback every "16n"(defined), which means synth.triggerAttackRelease() (triggers only one note) in callback function is called once every "16n"; however what I wanted to achieve was to play a fixed set of notes every "3m", therefore Tone.Part seems to be the solution ?
Challenge2
My second problem then was to figure out how to transpose the entire array of notes in Tone.Part, as all the triggerAttackRelease() functions are called before setup, and my notes were passed in into the callback function in Tone.part event. I'm not sure how to get the notes variables from that function (use dot syntax?) so as to change the steps of transposition constantly in my draw loop with mouse location.
My harmony sketch: https://editor.p5js.org/ada10086/sketches/HkXF3s0cm
My visual sketch: https://editor.p5js.org/ada10086/sketches/SytG2QgsQ
Combined final sketch(transposition not working yet): https://editor.p5js.org/ada10086/sketches/rJRxVxZiX
Week 5 Harmony Interface
I like how intuitive this chord interface is for displaying all the major and minor triads on a keyboard and distinguishing the sound qualities between the two types of chords. However, I think it is overly simple and some information can be added on the interface to make it more useful as a tool for music learners, educators and composers. The purpose of this interface is implied in two modes: chord notes display mode and chord detection mode. First mode is to easily locate all the notes in any given key signature, scale or mode, degree of chord scale and inversion from the drop down menus, and display all the chord notes on the keyboard and the staff. The latter mode is to detect key signatures and the rest of the notes in a chord given the bass note of a chord being pressed on the keyboard, the degree of scale and inversion selected from the drop down menus.
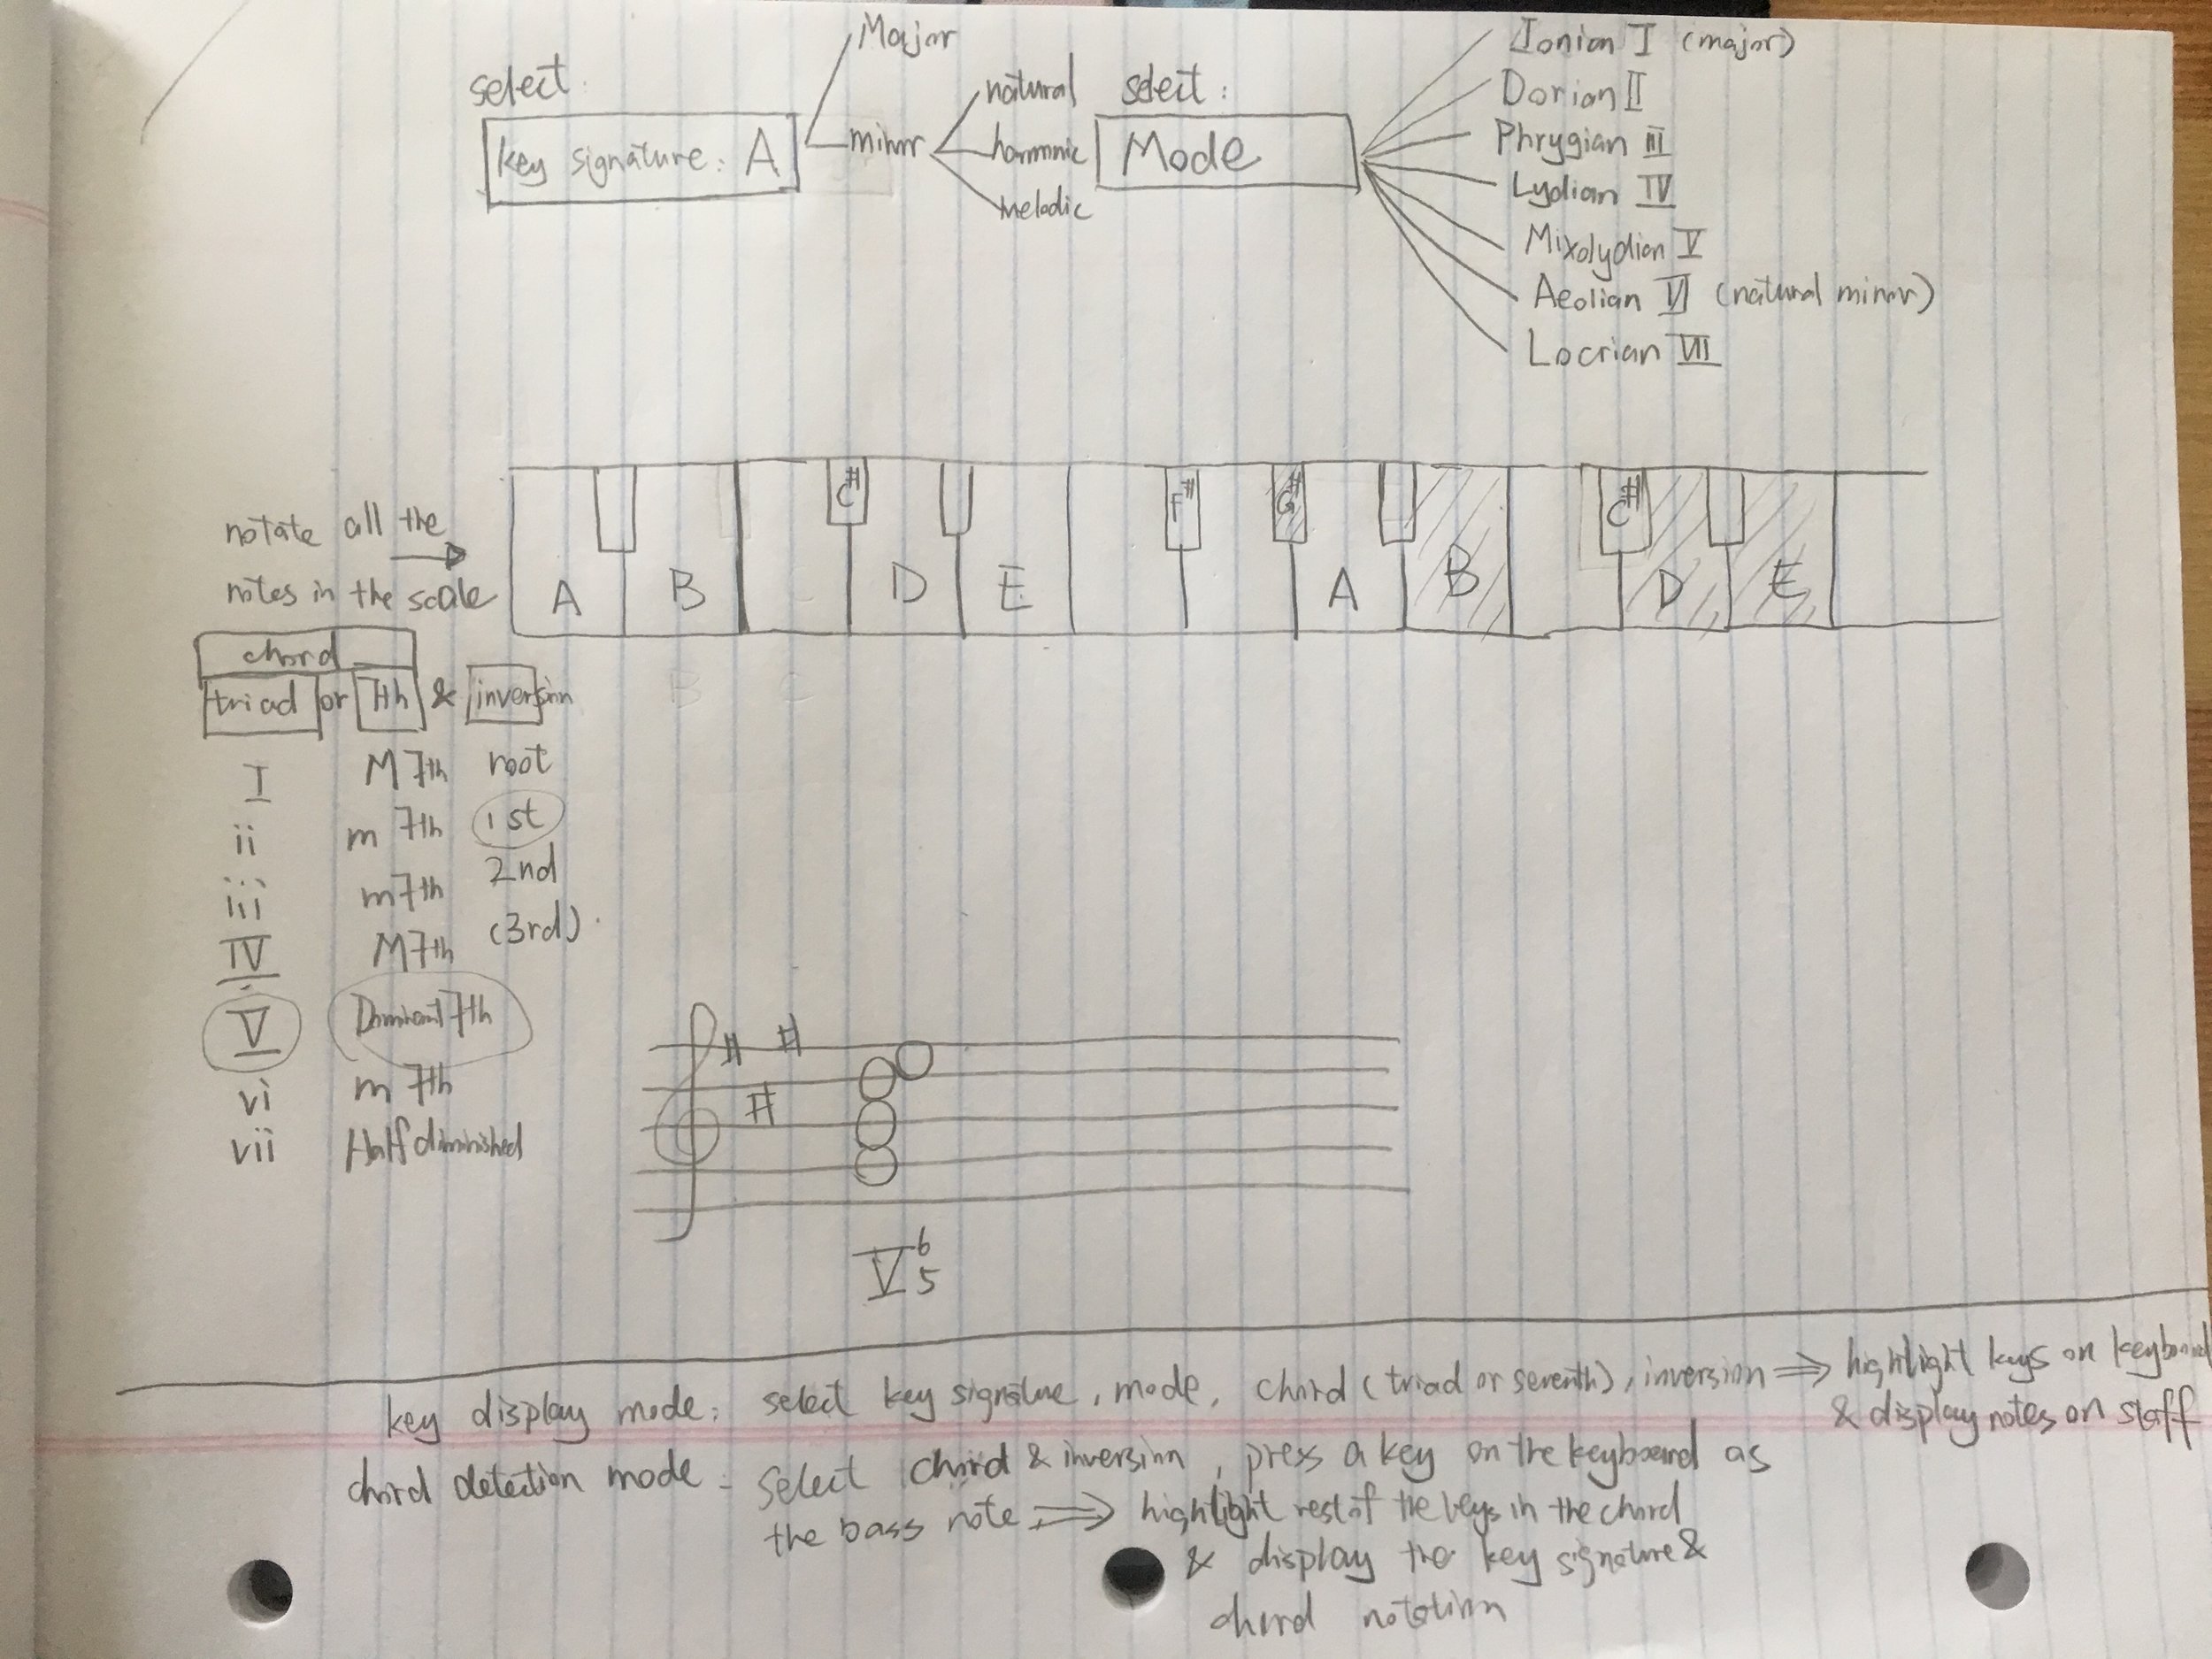
There isn't too much of a difference graphic wise, only there is a longer keyboard with a five-line staff underneath and a few drop down menus are added for all key signatures, all modes on top, and chord, which can be either triad or 7th chord, and its inversion.
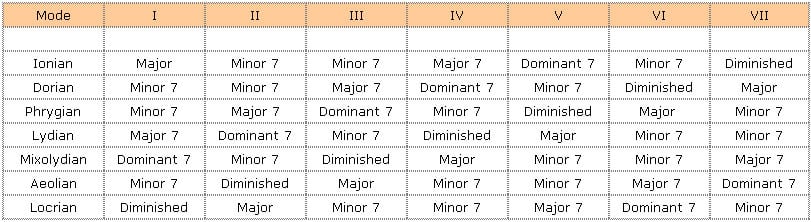
The list of items in each drop down menu differs according to which key and mode or chord degree of scale and inversion are selected, determined by these charts:
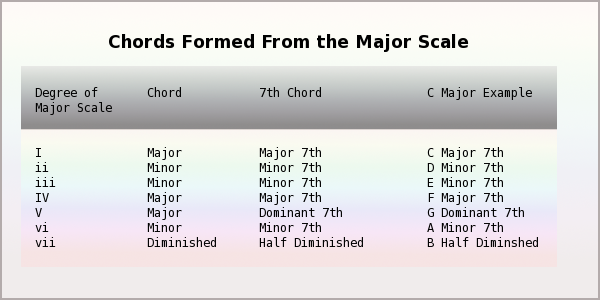
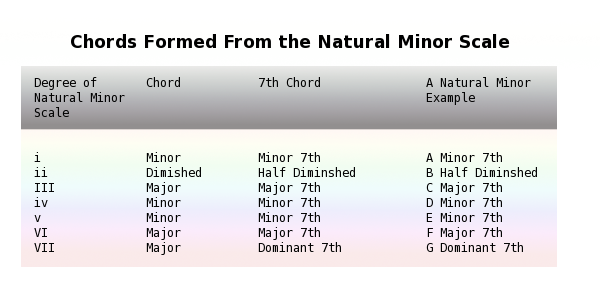
Having learned music theory and played instruments many years, I found this interface could be very useful in music theory education as it lists all the possibilities and combinations of any chord in any key and mode, highlights all the notes and display the chords and visually describes the relationships between chords. For composers, this could also be helpful when they are picking chords for their chord progressions, so they can locate each notes in the chords they want to use more accurately and quickly without having to do the conversion and mapping in their head.
Week 4 Synth composition
My inspiration for this assignment is the Roland TB-303 bass line synthesizer, which creates a very distinctive squelching sound and is present in a lot of music I listen to. My goal was to regenerate a sound as close as possible to TB 303 with synth on Tone.js, by creating a repeating melody pattern and manipulate two of the variable parameters on the original synthesizer (filter envelope decay, and cutoff frequency or Q(resonance) ) and to have those parameters also manipulate my sketch on canvas. I looked up some characteristics of the synthesizer and found it is an analog subtractive synth that creates Sawtooth and square wave only, with no LFO, and a 24dB low pass resonant filter, non self oscillating. Both the amplitude envelope and the filter envelope have a sharp attack and exponential decay. With that goal in mind I played with a virtual TB303 synthesizer in the browser: and came up with a melody patch: https://soundcloud.com/chuchu-jiang/virtual-tb-303
Challenge:
- My original approach was to create a subtractive synth with Tone.oscillator and apply a filter, an amplitude envelope, and a filter envelope manually. However, I couldn't figure out how to have an oscillator play a set of notes (an array of notes I assigned) generated with the same filter and envelopes(so I can later manipulate the whole melody with these parameters), because notes are passed in at the beginning: osc = new Tone.Oscillator("F2", "sawtooth"); and triggered separately with ampEnv.triggerAttackRelease(); and filterEnv.triggerAttackRelease(); ,where I cannot pass in a set of note values. I found a way around this problem by creating a MonoSynth instead, which has all the subtractive synth features built in(oscillator, amplitude envelope, filter and filter envelope), so that I can later pass my patch of notes in synth.triggerAttackRelease(note, duration); .
- I am still using Tone.Transport.position.split(":") to get position of beats and notes and Tone.Transport.scheduleRepeat() to play notes repeatedly, I used a nested for loop for 4 bars of 4 16th notes, which was a little bit redundant. I was exploring other ways of scheduling how to play a loop of different notes using Tone.part
- As I was trying to manipulate the synth features as well as my sketch while the patch is being looped, I realized I need to place those variables in the draw loop. Since I had the all the features of MonoSynth constructed in setup, I had to find a way to manipulate them in draw repeatedly. My first attempt(code) was creating new Tone.Filter, new Tone.AmplitudeEnvelope, and new Tone.ScaledEnvelope in draw and have synth.connect(ampEnv);. but the sound would stop after a few loops, with some delay and noise and mouse location doesn't seem to change in Q or f values doesn't seem to affect the sound. So my second attempt(code) was moving the whole MonoSynth constructor into draw loop, and the interaction seemed to work but still sometimes the audio loop would stop for a while before continuing to play. I was wondering if the delay in sound has something to do with the values I put in. ===> solved: putting all the MonoSynth parameters in setup overloaded my browser causing glitch in sound, so I accessed the parameters by using dot notation: synth.filter.Q.value = q; and synth.filterEnvelope.decay = d;
At the end I combined my MonoSynth with my 2D toroidal flow sketch and here is my final sketch .
https://youtu.be/K4LC2gTjgbQ
W3 Interactive Melody
I had an idea of mapping 8 different synth tones to keyboard keys asdfghjk, and extract the waveform properties from each synth tone using FFT, and display each tone vertically as a line across my canvas like this example: https://p5js.org/reference/#/p5.FFT. So each time a key is pressed, the relative note and line is triggered. I used the syntax from the example. However I couldn't get it to work, nothing was drawn on the canvas when I applied the example code. Later I realized, I was creating sound with tone.js, which is a web audio framework separate from P5.sound, therefore the tone.js and FFT functions in P5 sound would not be compatible. So I looked up FFT on tone API . However, I couldn't find any documentation on how to get an array of values from the function like the P5 example. The example codes in tone are very limited. So I changed my approach, instead of extracting properties from tone.synth(). I decided to sketch the waveforms manually and have each synth note trigger the wave. With that approach, I made two sketches. One for audio and one for visual.
With the visual sketch I have the certain parameters of the waveforms increment or decrement as I go down the lines. I referred to this sine wave example to and created a Wave object and generated an array of 8 waves, passing in wave speed, wave period and wave y location. My biggest challenge for this part was to create an array of objects as the relevant topics have not yet been covered in ICM class.
With the audio sketch, I first used function keyPressed(){}:
function keyPressed(){ if (key === 'a') { synth.triggerAttackRelease("C4",0.1);
I played around with synth.triggerAttackRelease() and function keyReleased(){}. however, its either the sound stops before I release the key or it goes on forever.
I realized I wanted to achieve the effect that when key is pressed, the synth is played continuously, and when key is released, synth stoped. So I used if statement within the draw loop:
if (keyIsPressed & key === 'a') { synth.triggerAttackRelease("C4", 0.1); }
I was able to hold down a key to play a note, but it doesn't sound as nice as the synth generated in the keyPressed function, there was a little buzz noise.
And the issue I had with both approaches was I couldn't get multiple notes to play at the same time, ie to play a chord. There was only one note at a time even though I held down multiple keys on my keyboard. ==> solution: use polysynth , updated synth code
My code: https://editor.p5js.org/ada10086/sketches/rkS9kvhtQ
To play fullscreen: https://editor.p5js.org/full/rkS9kvhtQ
Video:
https://youtu.be/hOIvTyy9OEI
W2 Rhythmic composition
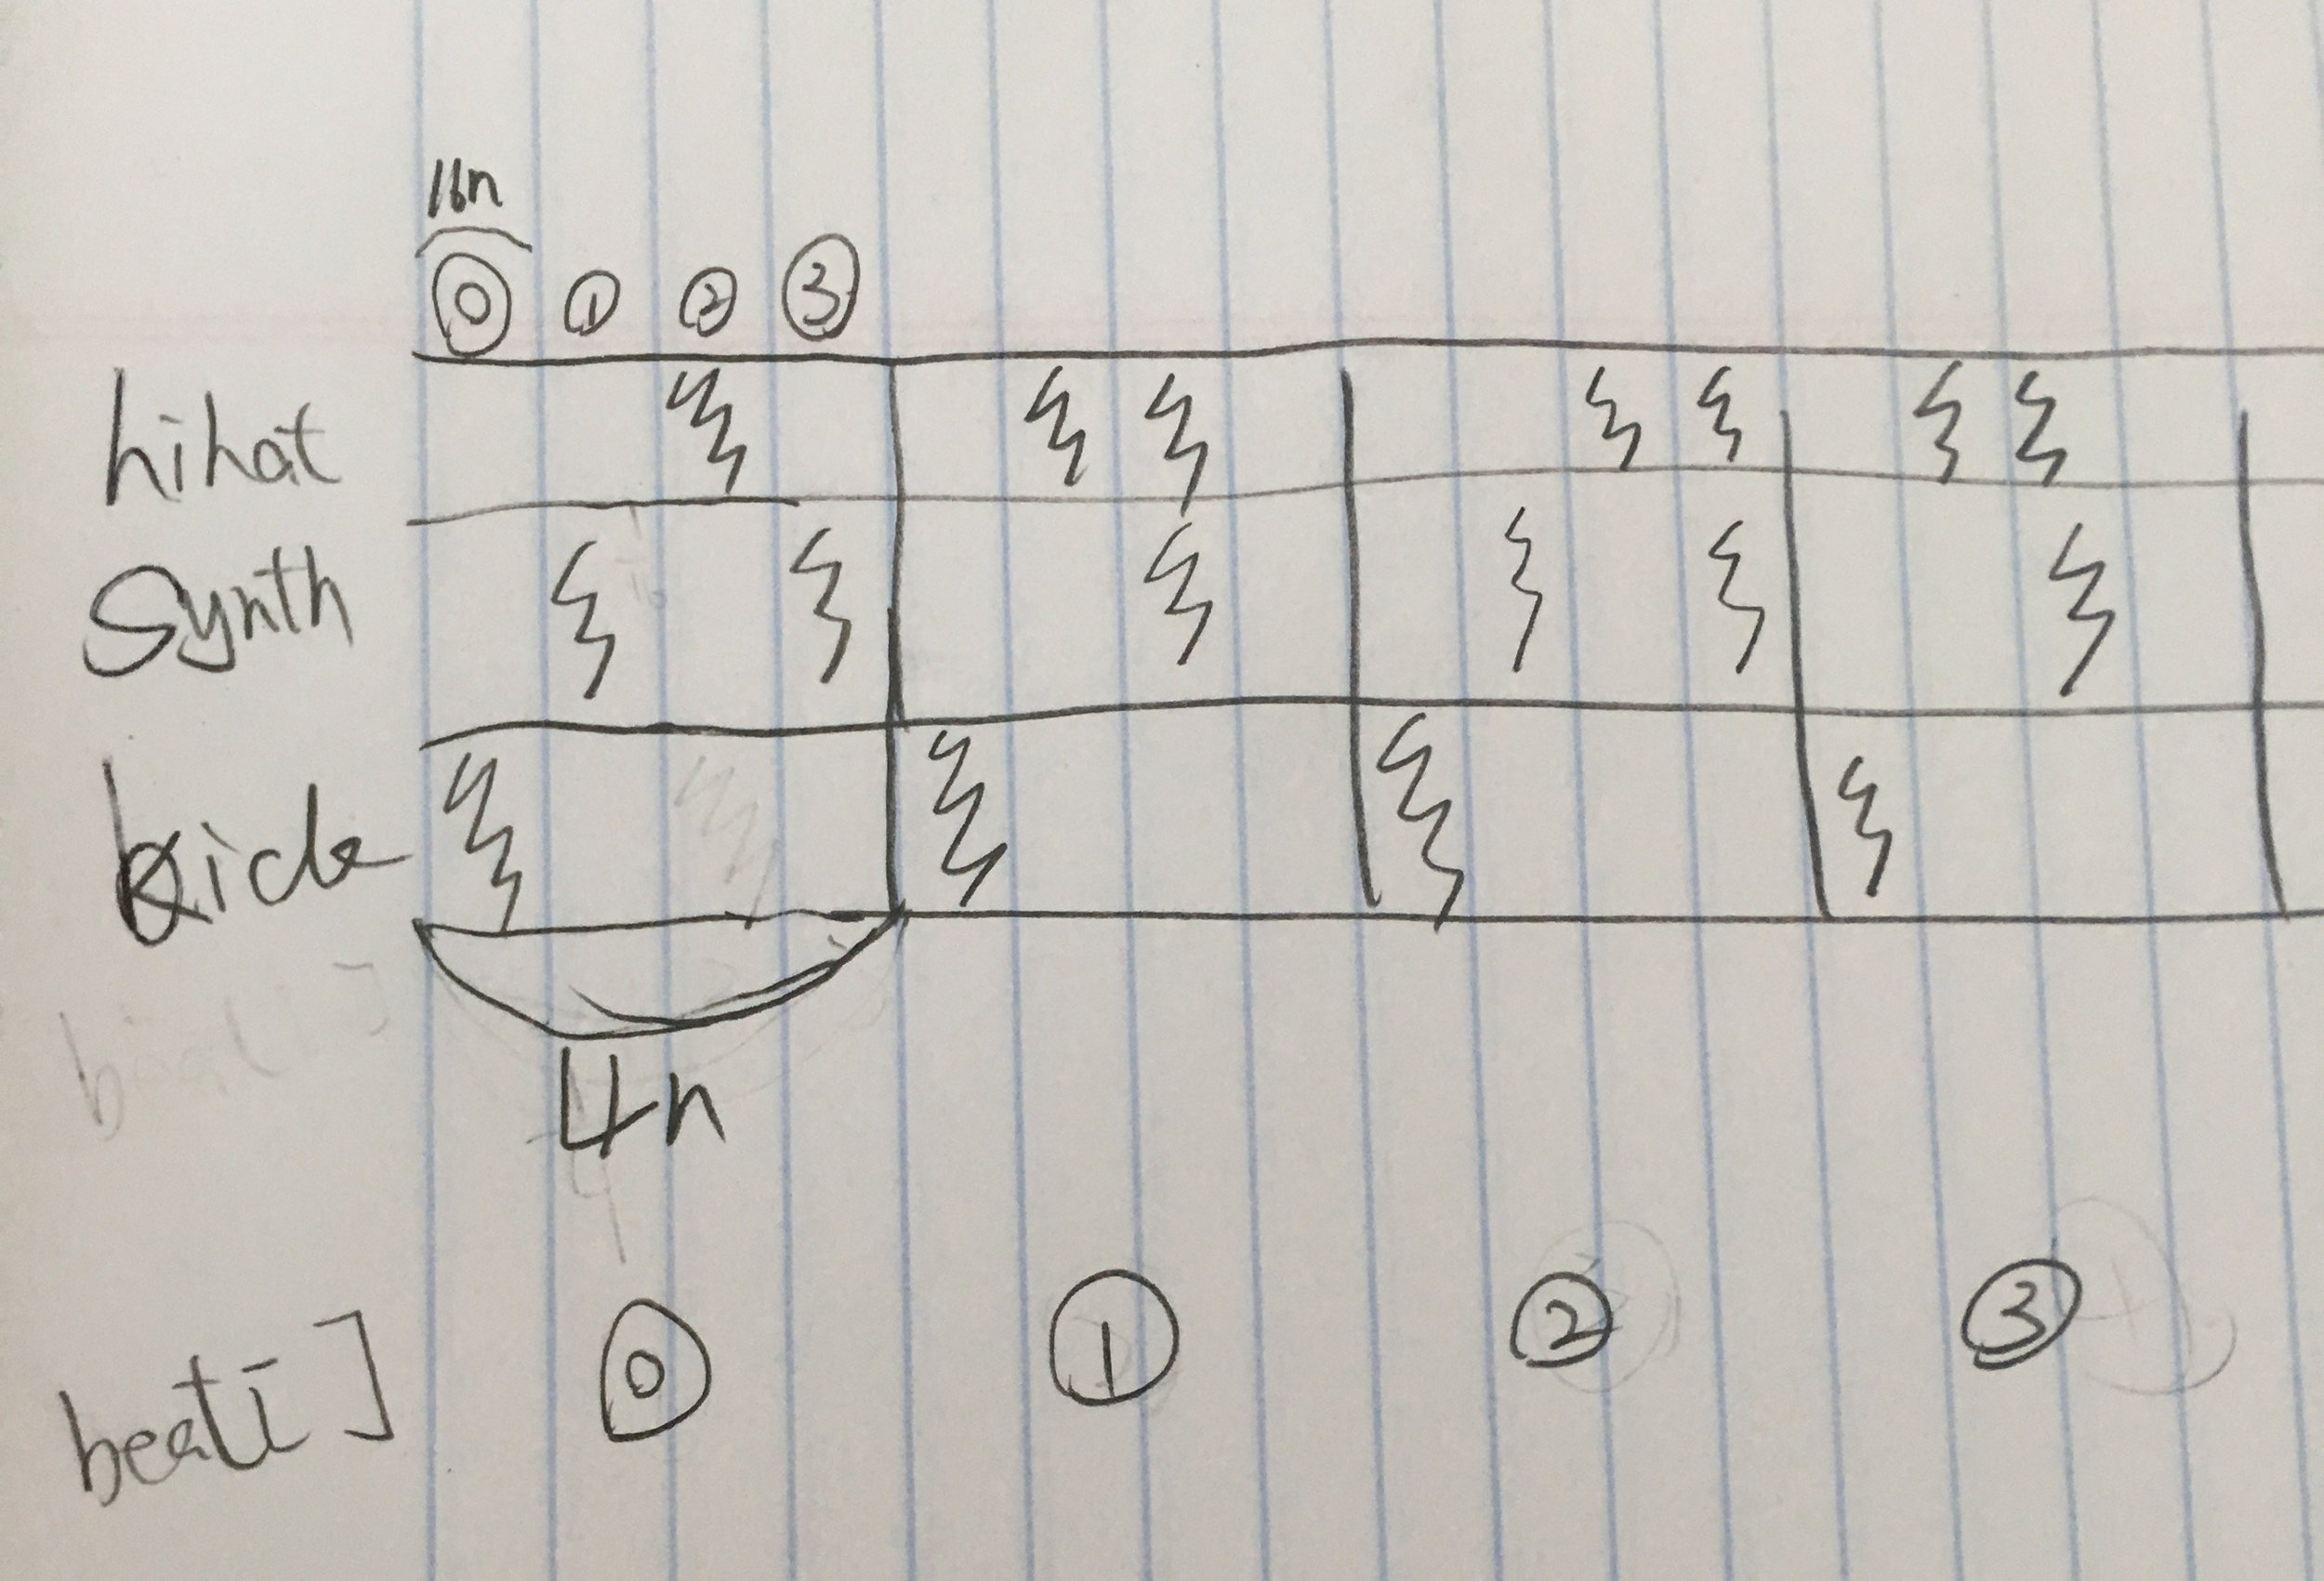
My rhythmic composition is a techno beat loop, including three instruments: a hihat, a synth bass, and a kick drum. My time signature is 4/4. Each kick marks one beat, whereas synth changes its pattern every 2 beats, and hihat every 4 beats. I subdivided each beat (quarter note) into 4 16th notes, as synth and hihat are arranged as quarters in every beat. I used Tone.Transport.position.split(":")[] to get the current position of beat and 16th note, however, the position of 16th note is not returned in integer[0,1,2,3] . Therefore, I had to convert it into integer using | , to get the exact 16th note position. I have one function for each instrument to call play as they are repeated in different duration(4n,16n). So for the first beat [0], for example, when beat == 0, 16th == 1 and 3 for synth, and 16th == 2 for hihat, and so on and so forth, I arranged the rest of the beats according to this diagram.
code: https://editor.p5js.org/ada10086/sketches/By5fJM4KQ
W2 Design rhythm interface - The hmtz hmtz train
As I was commuting on a train thinking about the elements of rhythm, I noticed that each time a chain of cars passes by a gap or a bump in between two sections of the train track, it would create a rhythmic bumping noise like the one in this video: https://youtu.be/MPPNqhf8fRs?t=29s
So I thought the noise is a result of a chain of cars passing a fixed point. And the speed of that rhythmic sound is a result of the moving speed of the train, as the train slows down, the pulse also slows down. So I played with the concepts of rhythms and the idea of passing train and its parameters like speed, number of cars, number of levels, numbers of doors and windows, and I was imagining a rhythm interface that is a train passing a gate that triggers different levels of sounds stored in each car. So I created this sketch:
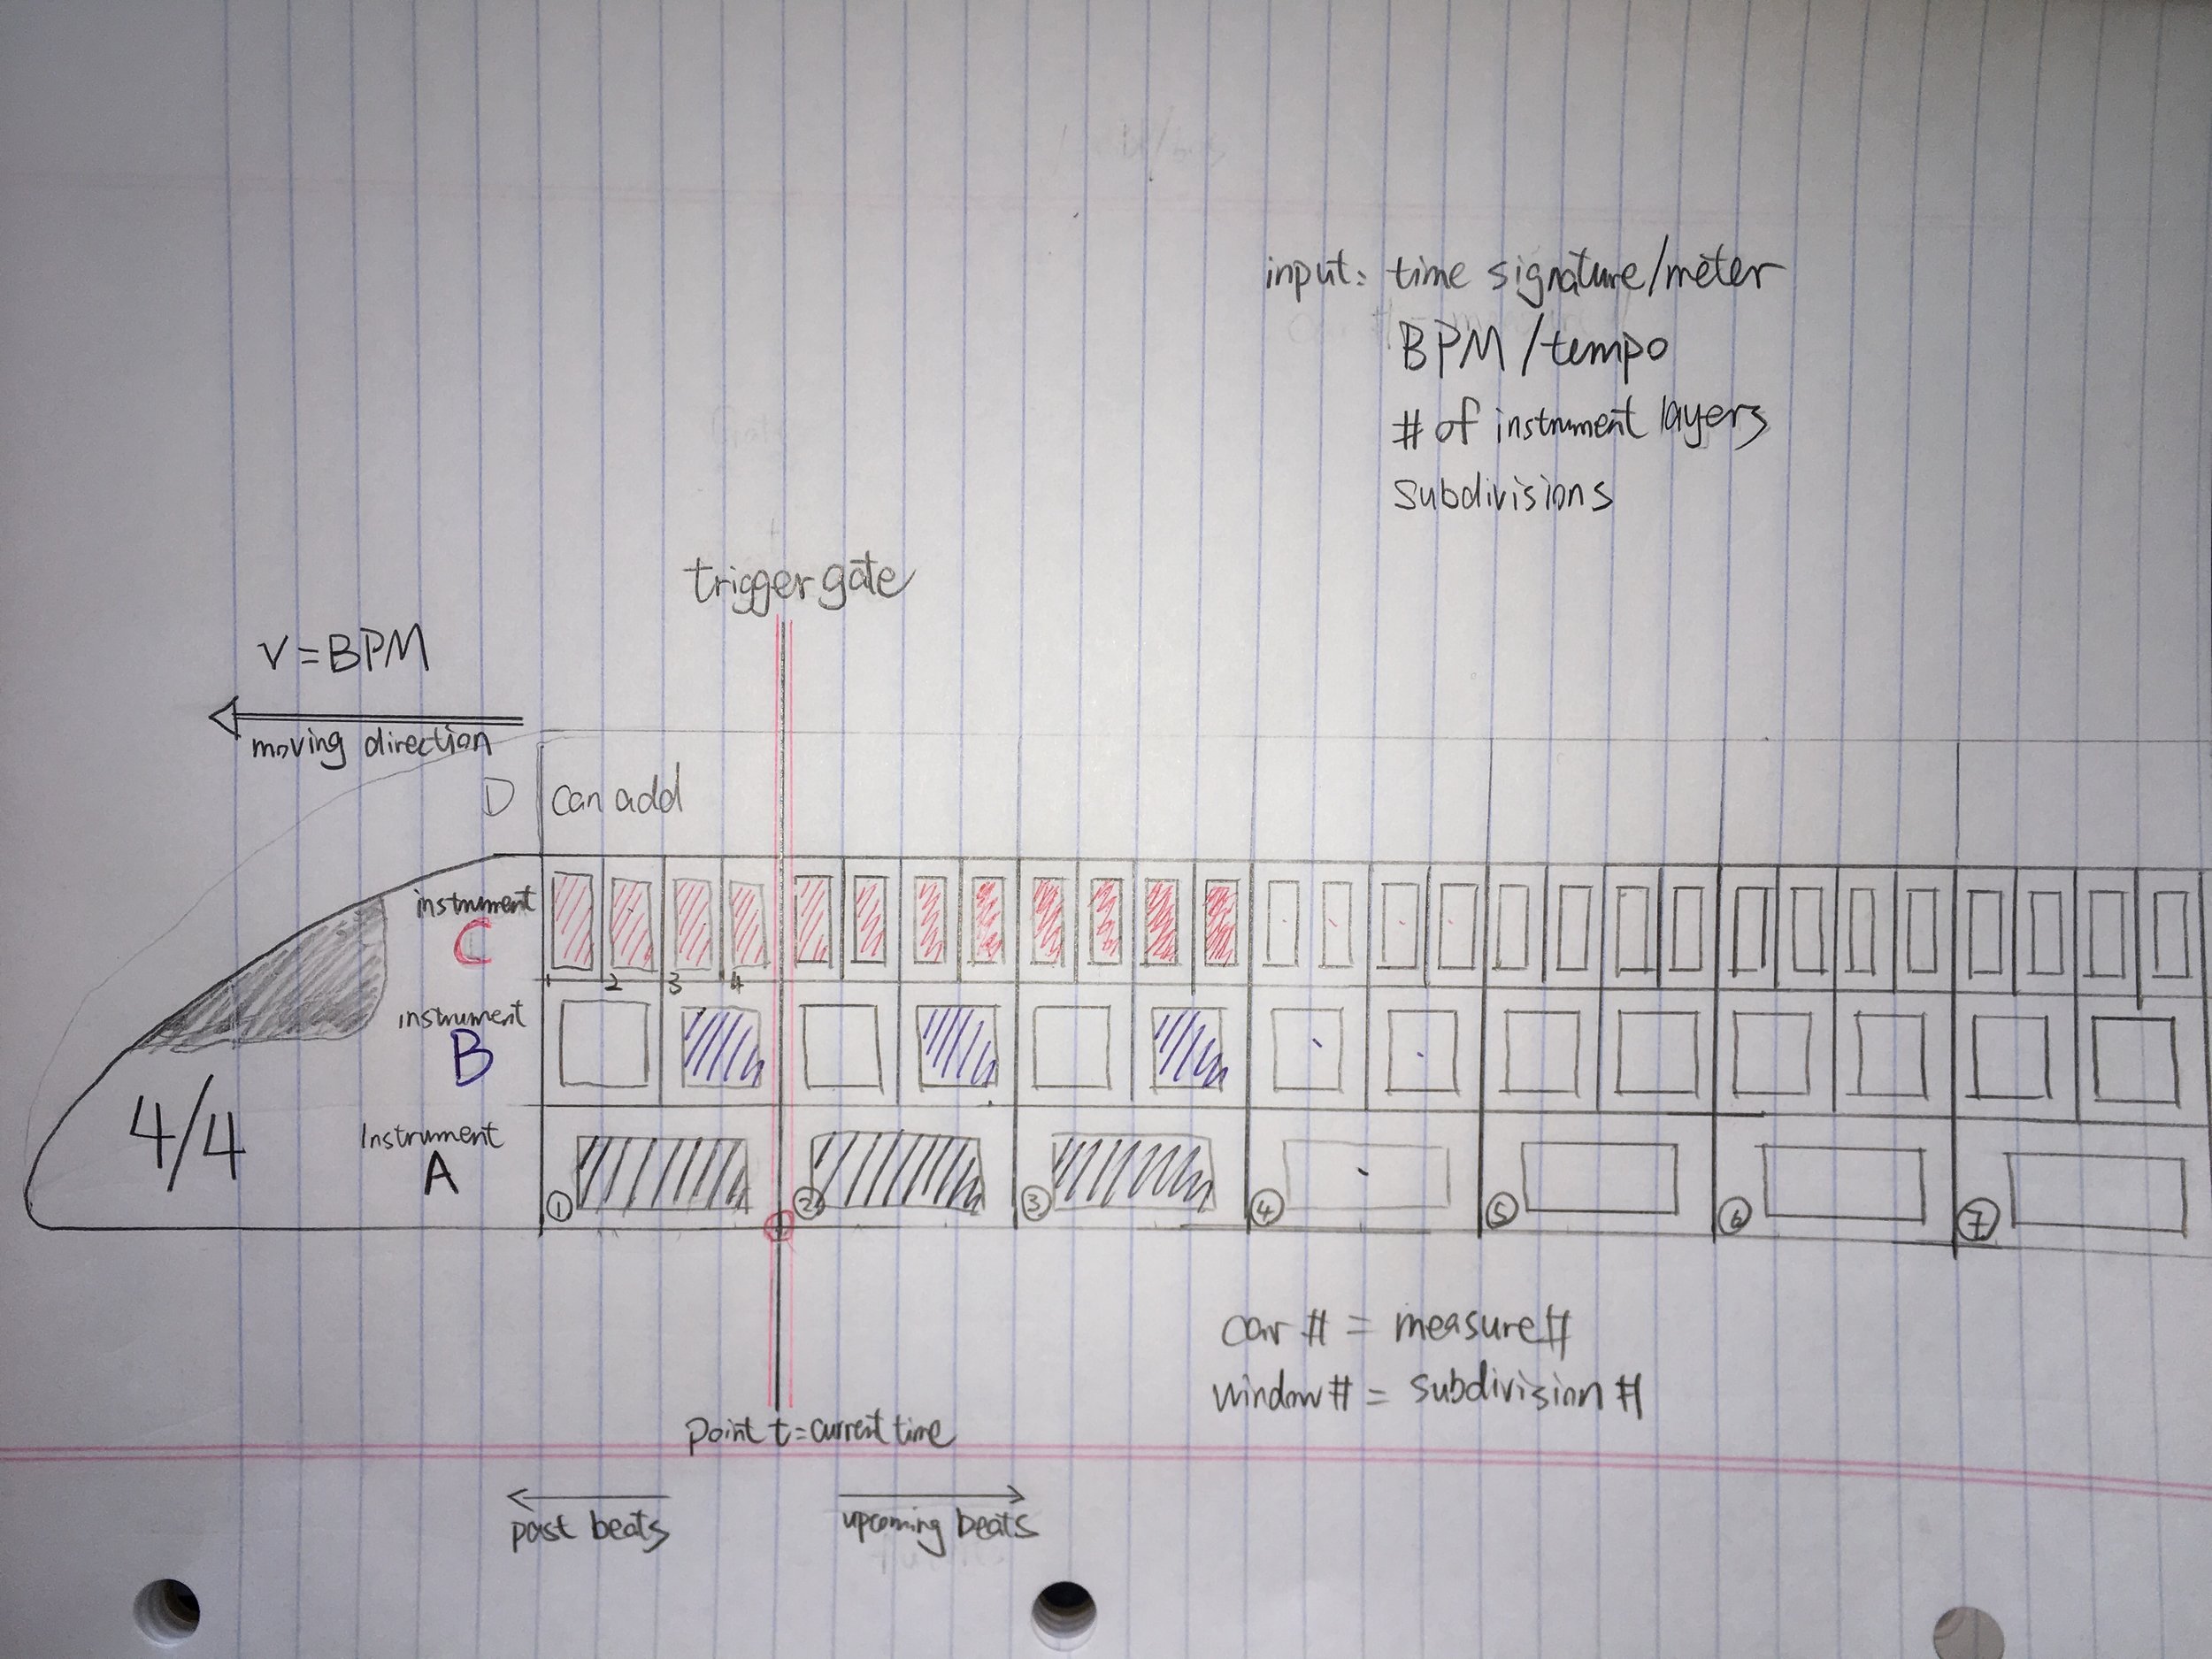
The train interface is constructed with several parameters:
# of levels: players can import multiple beat samples, each sample track creates a level on the train, tracks stack on top of each other vertically like different levels of the train. The number of levels indicates the number of instrument tracks.
# of cars: the entire length of the train is consist of many cars connected horizontally. Each car number indicates the measure number.
# of windows: players can input a time signature at train head and divide each level of a car into smaller sections represented by the number of windows on each level, this is to mark the subdivisions(windows) in a measure(car). If a player decides the meter to be 4/4, 1 full window on a car is 1 whole note, 2 windows are 2 half notes, and 4 windows are 4 quarter notes, etc... players can then toggle on and off the lights on each window to place a beat of a certain duration at a certain subdivision in a measure, and copy a certain pattern to paste in later windows. As an example, in this loop, the most basic house/techno music rhythm pattern, the black windows in the sketch represents kick drum, blue window snare drum and red window hi-hat.
Speed of the train: players can also input speed of train in the form of BPM, the higher the BPM, the faster the train moves. for example if the meter is 4/4, BPM is 120, there is 120/60=2 beats per second. So we can imagine in every second, two windows of quarter notes would pass a certain point.
Gate: somewhere in the middle of the screen, there is also a gate, a fixed point for each car of the train to pass, acting like a trigger point for each notes(windows) carried in the car. The train travels from right to left, the gate represents current time; everything to the left of the gate is past beats; whereas everything to the right are upcoming beats to be played when they reach the gate.
----------------
Limitations I can think of right now: since I have not yet seen this moving train in action, I can not picture how fast it will move if I set the BPM to a common value like 160, if it moves too fast it will be really hard for our eyes to catch each beat and understand what is really going on in each measure.
Applications: I can see this interface being a game/instrument to be experimented by kids who are learning music and want to create their own beats by helping them visualize how rhythm works while having fun running their own train.
W2 Response to interactive rhythm projects
Two of the drum machine examples that impressed me the most are Groove Pizza and TR-808 re-creation one. Groove Pizza has a very simple, and visually appealing interface. It managed to spatially map every single beat generated by different percussion instruments into points in 2D circular plane, aka, pizza. One cycle through the pizza represents one measure/bar. The number of pizza slices represents the number of subdivisions in a measure. The points are then connected to form different shapes, most of the time symmetrical, given the repetitive nature of rhythm. Therefore, notes on a linear timeline are formed onto a more recognizable spatial arrangement in front of players. Different genres of music have different shape patterns on the pizza, which tells player a lot about the rhythmic characteristics of that genre. I can see this application has great educational potential in music education.
However the project I had the most fun playing with is the Roland TR-808 recreation. It took me a while to figure out how to use it and what each knob and button are for. I looked up the original physical model and noticed they look pretty much the same. This project lacks originality and creativity as it's simply a virtual duplication of the physical machine. However by playing with the web version I was able to get the gist of how the physical drum machine works without having to visit a store or obtaining a physical product. I can see this project being applied to many other musical interfaces by demonstrating how to use them in a very accessible web environment, so that both amateur and professional producers are able to "try out" the machine virtually before they decide which instruments suit them the best.
Here's a screen recording of my first TR-808 creation:
https://youtu.be/1TAtorV5uqw
W1 Create a digital, audio-visual, sample based instrument
As I'm still a beginner user of the p5js web editor, for this audio-visual sample based instrument assignment, I was only able to create some simple visuals. The best sound sample to go with my visual is minimal ambient and analog sounds. I used two samples from freesound.org I named ambient and signal. I also referred to p5 sound library to generate an oscillator with new p5.noise() as the third sound.
I started with creating a snow screen with all random greyscale pixels similar to the old fashioned static TV screen. Then I had key 'a' to toggle play ambient.wav and the snow screen.
Then I used mousePressed() to turn on signal.wav, which is a higher pitch white noise. At the mean time the snow screen turns into RGB scale from greyscale. When mouse is released, however, the RGB is turned off.
Finally I created a greyscale slider reactive to mouseX, to change the bandpass frequency of the filter of the p5.noise oscillator generated. I referred to: https://p5js.org/reference/#/p5.Filter . The bigger the mouseX value is the higher the frequency.
The longest time I spent when I was stuck was to figure out how to toggle play with key and mouse, using boolean aPressed, sound.IsPlaying(), and figure out how to use event functions like keyPressed(), mousePressed(), mouseReleased() .
I wanted to keep this first project relatively simple as I slowly start to build my programming skill. Therefore I did not spend much time worrying about the sound input.
my code: https://editor.p5js.org/ada10086/sketches/SJz68kd_Q
A screen recording of me playing with the instrument:
https://youtu.be/G0yhnVROViA
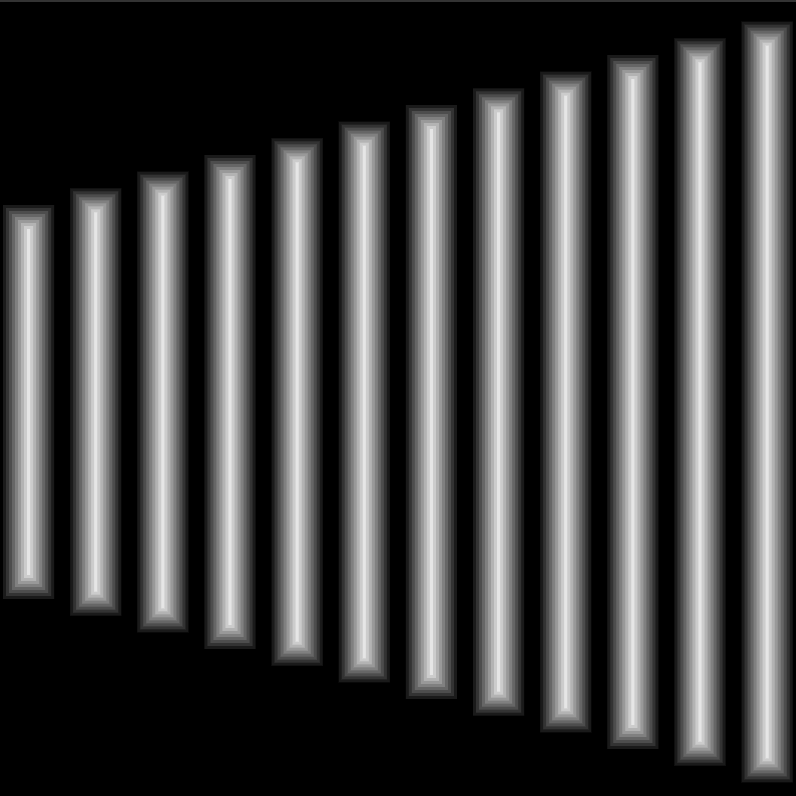
W0 Music Sharing — Stephan Bodzin – Lila
Picking one piece of music to share is the hardest thing for me ever. I stumble upon millions of amazing creations and get inspired every second of it as I listen to at least 5 hours of music on an average day. A handful of great pieces came to my mind while brainstorming which one I'd like to share with The Code of Music class. I found "Lila" by German producer Stephan Bodzin from his album "Power of Ten" might be a great example of new media art in the form of digital audio production and computer generated graphics. The visual representation resembles simple crayon-drawn vertical lines increasing in its quantity, while gradually intruding towards the viewers from its 2D plane into 3D space. The simplicity in this animated graphic represents the great depth and power in the rhythmic layers and beautiful chord progression in the music. I remember when I first came across this song I was in awe as it evoked so much emotional response and threw me into deep contemplation. I found it hard to pick a 30 second part because the song is more about the structural add-on and subtle development throughout the 7 min duration than it is about the traditional verse-chorus-verse musical structure. However if you do not have enough attention span to enjoy the whole song, I suggest slowly scrolling through different parts of songs from beginning till the end and notice the change in graphic and musical progression.
https://youtu.be/jF_hBX-6x9s