
For this clock control assignment, I wanted to make a very simple, easy to use clock interface with the least amount of controls to set date and time on a clock.
My hardware choices are MKR Zero as it has a realtime clock on the M0 processor, and a 377 rotary encoder with push button. I never used a LCD display before, so I decided to experiment with a standard 16x2 LCD display as the digital output screen for the time.
User flow:
Press button to enter setting mode from display mode. Starting from month value, rotate the rotary encoder clockwise to increment and counter clockwise to decrement by 1 to set month between 1-12, once set, press button again to confirm and start setting day between 1-31, and hours, minutes, so on and so forth. Once the last value of seconds is set, correct time is displayed on the LCD and clock keeps running.
Therefore, the clock has only one control that implies two user actions: single button press to confirm setting the current date/time value and jump to the next value, and rotate the rotary encoder to select the values for date and time within their limits.
Process:
I broke down the project into many smaller parts according to functionalities and user interactions - LCD, button press, rotary encoder, and real time clock.

Breadboard view
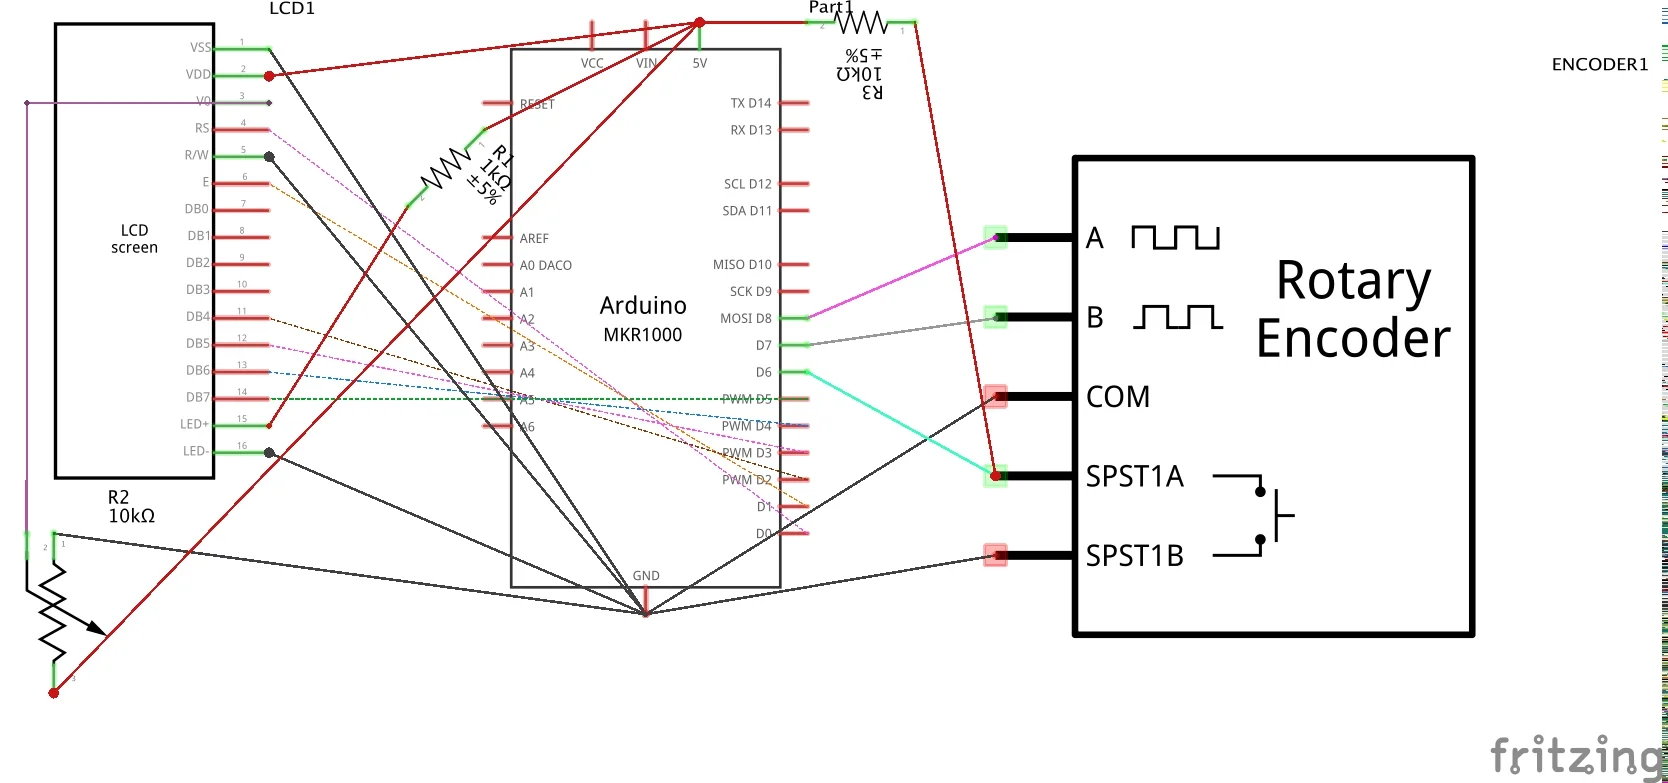
Schematic
For the button press event, I used EasyButton library. The library assumes a pull up resistor, has a debounce time of 35 milliseconds in the button’s constructor, can detect presses, releases, long presses and sequences.
I tested the code for single press, press sequence, and long press events, because originally I imagined the users would long press to enter setting mode. When finishing selecting current time value, single short press to set the value and jump to the next value until the press on the last value which sets the display time. And maybe I would have double press to enter some other mode.
I used the Encoder library to test the rotary encoder. I had the encoder reading /4 so that it increments/decrements the date/time values by 1 with each click. In my original experiment with month values, I had it set so that when it reaches the limit 12 or 1 it will just keep printing 12 and 1 with further clicks in the same direction, one click in the reverse direction moves back to the previous value.
And then I realized it would be more intuitive to have the rotary encoder reading rotate around the limit 1-12. When it goes over 12, it goes back to 1 and keeps going up if its same direction as opposed to staying at 12. I tried to use modulo operator to rotate the readings but it didn’t work out as expected so I just used rewrite() to reset the encoder reading back or forward one cycle every time when it reaches the limit. However it seems like sometimes there would be jumps in between the values, and I had to rotate back to get to the limit if that’s the value I want.

I followed this tutorial to set up my LCD display, and used liquidCrystal library to test out ways of displaying character and numbers. I wanted to use blinking cursor or blinking characters to indicate the current values being set. However, both cursor() and display() requires delay() which would cause delay in encoder readings, and the blink() method only works with one digit at a time. So I ended up not using any blinks, and instead displayed strings like “set month”, “set hours” on the first row, but blinking would be a better implementation on the interface.
Finally, I referred to the RTCZero library and integrated my LCD, button press and encoder reading code to set time.
Some issues I experienced:
My button presses were rarely detected, and my encoder reading was not changing very smoothly, which did not happen in my test codes. I found out it was because the RTC example has delay(1000) in the loop for updating time every second so it only reads button press once per second. delay() would interrupt both button and encoder reading so I took it out and it fixed the problem.
However, when there was a fast button press, onPressedForDuration (long press callback) would be called instead of onPressedCallback (quick press callback). And it seems like the LCD library was somehow disrupting the EasyButton library’s ability to detect a long press from a normal press as the problem did not exist when there was just the RTC and the button code with time being printed on Serial.print(). So I decided to take out the long press callback and just have a quick button press and rotating encoder to control the clock.
Code:
Github repo for all parts of code: https://github.com/ada10086/Tangible-Interaction/tree/master/W1_Clock_Controls
Final clock controls code: https://github.com/ada10086/Tangible-Interaction/blob/master/W1_Clock_Controls/Clock_Controls/Clock_Controls.ino
<script src="https://gist.github.com/ada10086/120ec29274d4009baa94bd3eb409472d.js"></script>
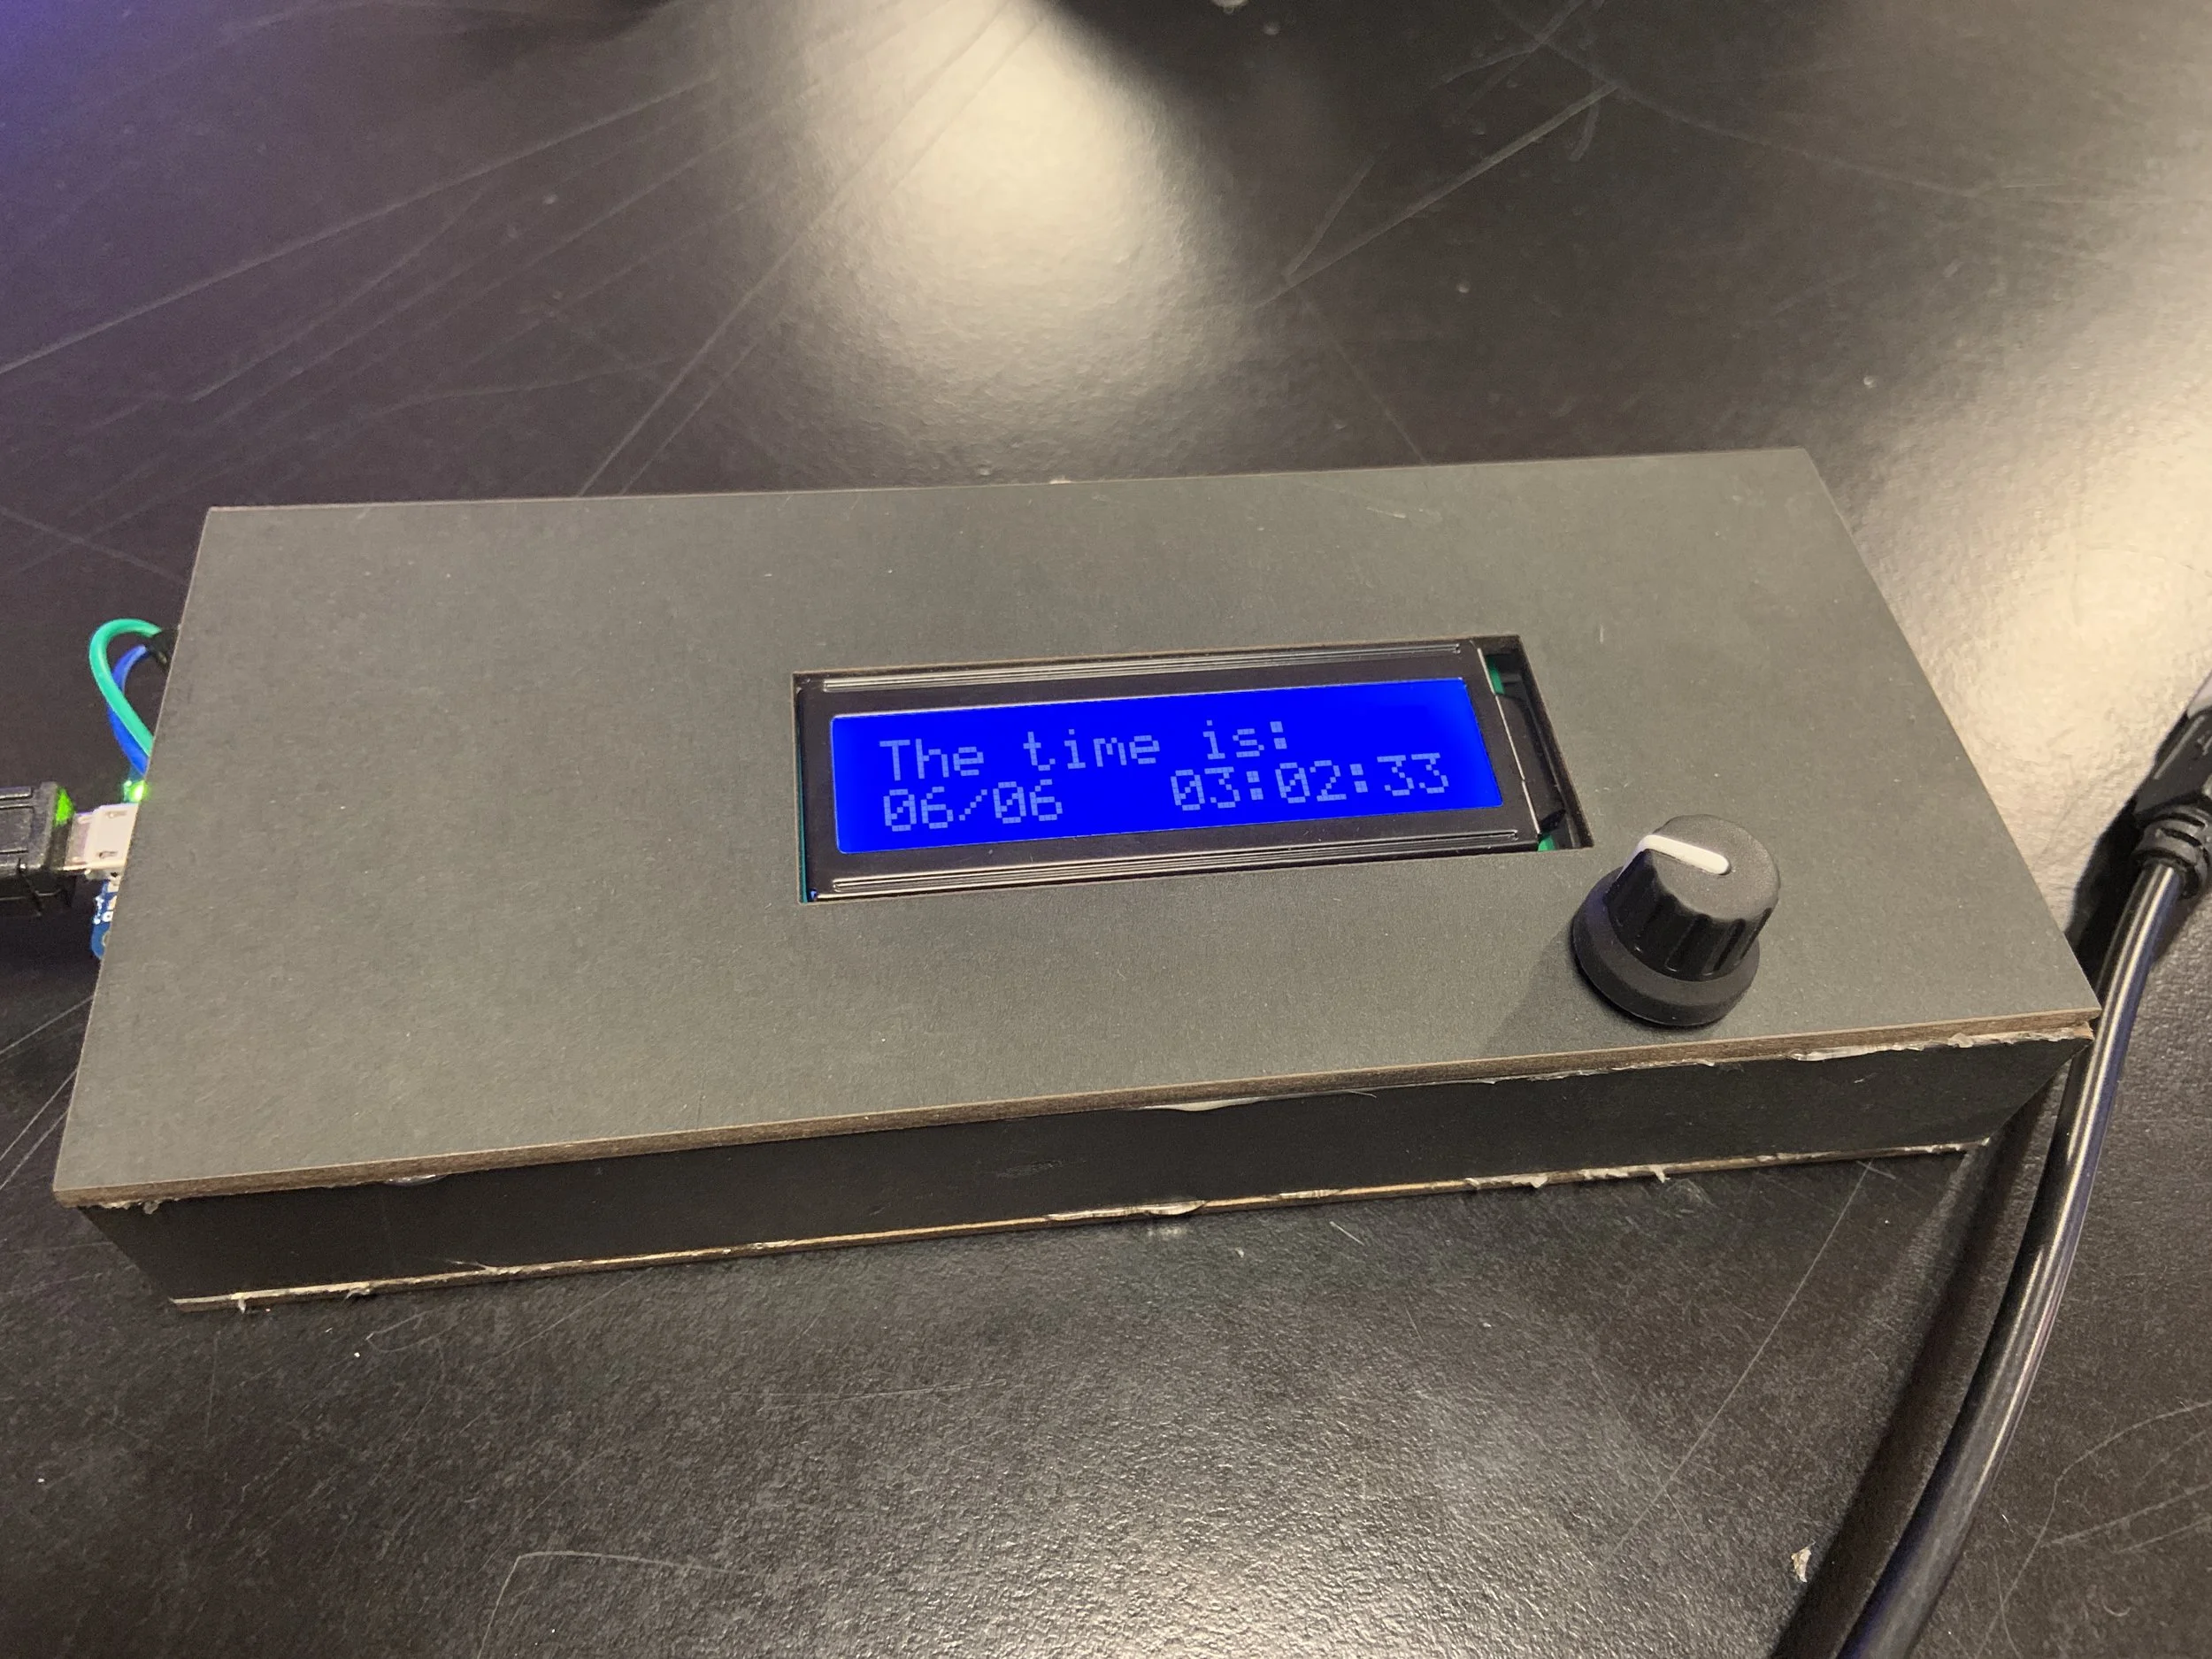
Fabrication:
I reorganized my circuit and laser cut an enclosure for the circuit out of a box cover so that only the screen and the rotary encoder is exposed on top of the box.

before

laser cut template

after
Takeaway:
There can be plenty of libraries out there for a same sensor/control, but each one is different in terms of the specific problems it solves and assumptions it has. During the process, I learned how to search for libraries that best suit my need and serve the purpose for a particular interface.
Breaking down the whole project into small sections according to functionalities and interactions. Programming each section individually and then combing them piece by piece was very helpful for adding extra features as well as for debugging.
The less number of controls the interface has, the harder the design and more complicated the programming logic is.
Reviewed variables in Arduino - int, long, byte, String, array, and cleaned up my code with functions and switch case statements.